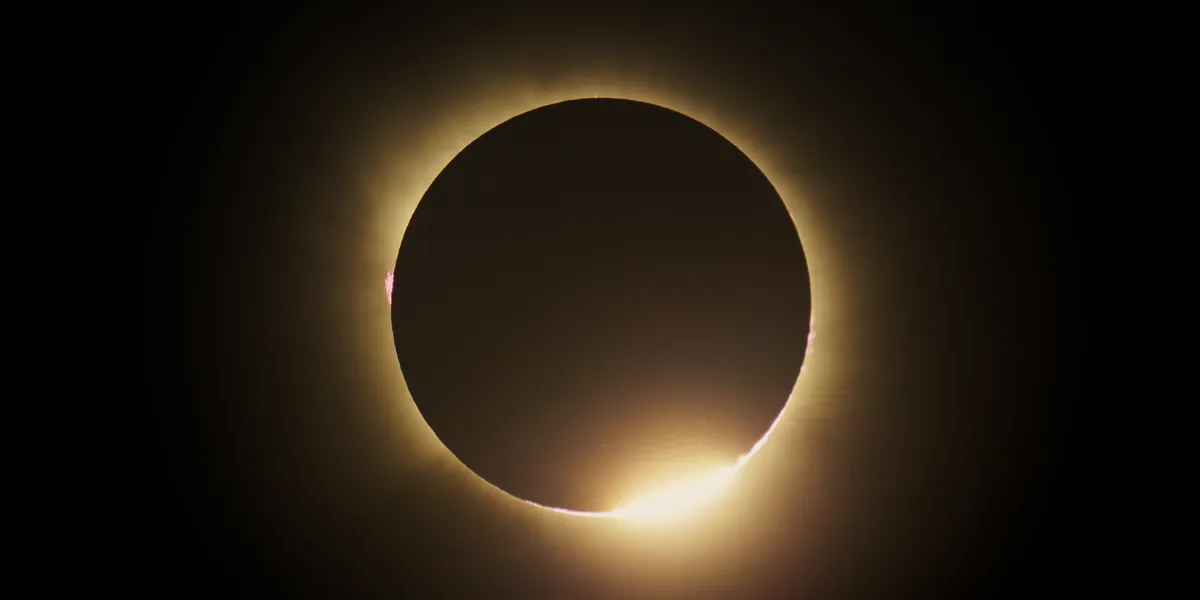
74 seconds of totality: how we photographed the 2026 eclipse
On 12 August 2026 the Moon’s shadow crossed the north of Spain. From where we set up, totality lasted about 74 seconds starting just after 20:29, with the Sun barely nine degrees above the horizon.
The plan was to capture it with a Mak 127 telescope (1500mm f/11.8) as a full timelapse of the eclipse and, within totality, the phenomena that last a second or two: Baily’s beads, the diamond ring and the earthshine. Alongside that, a wide-angle frame of the whole scene. And, in the middle of all that, to actually enjoy it.
There was one opportunity and plenty of unknowns. What follows is the whole process — what had to be built, calculated and rehearsed beforehand, how the day went, and what came out of it.
The groundwork
Three projects had to exist first:
An intervalometer built on a Raspberry Pi, so the different configurations would run automatically without anyone touching anything — partly to make the day a relaxed one and be free to enjoy it. It got significant last-minute changes to capture as much as possible through the transition into totality, including Baily’s beads and the diamond ring, plus the earthshine during totality itself.
A magnetic solar filter for the Mak 127, because the filter has to come off seconds before totality begins and go back on once it ends, without moving the telescope and at the risk of destroying the Sigma fp’s sensor. We were counting on the low Sun and good synchronisation to keep that risk small.
And a power bank to run everything in the field: camera, speaker, the telescope’s GoTo mount and the intervalometer.
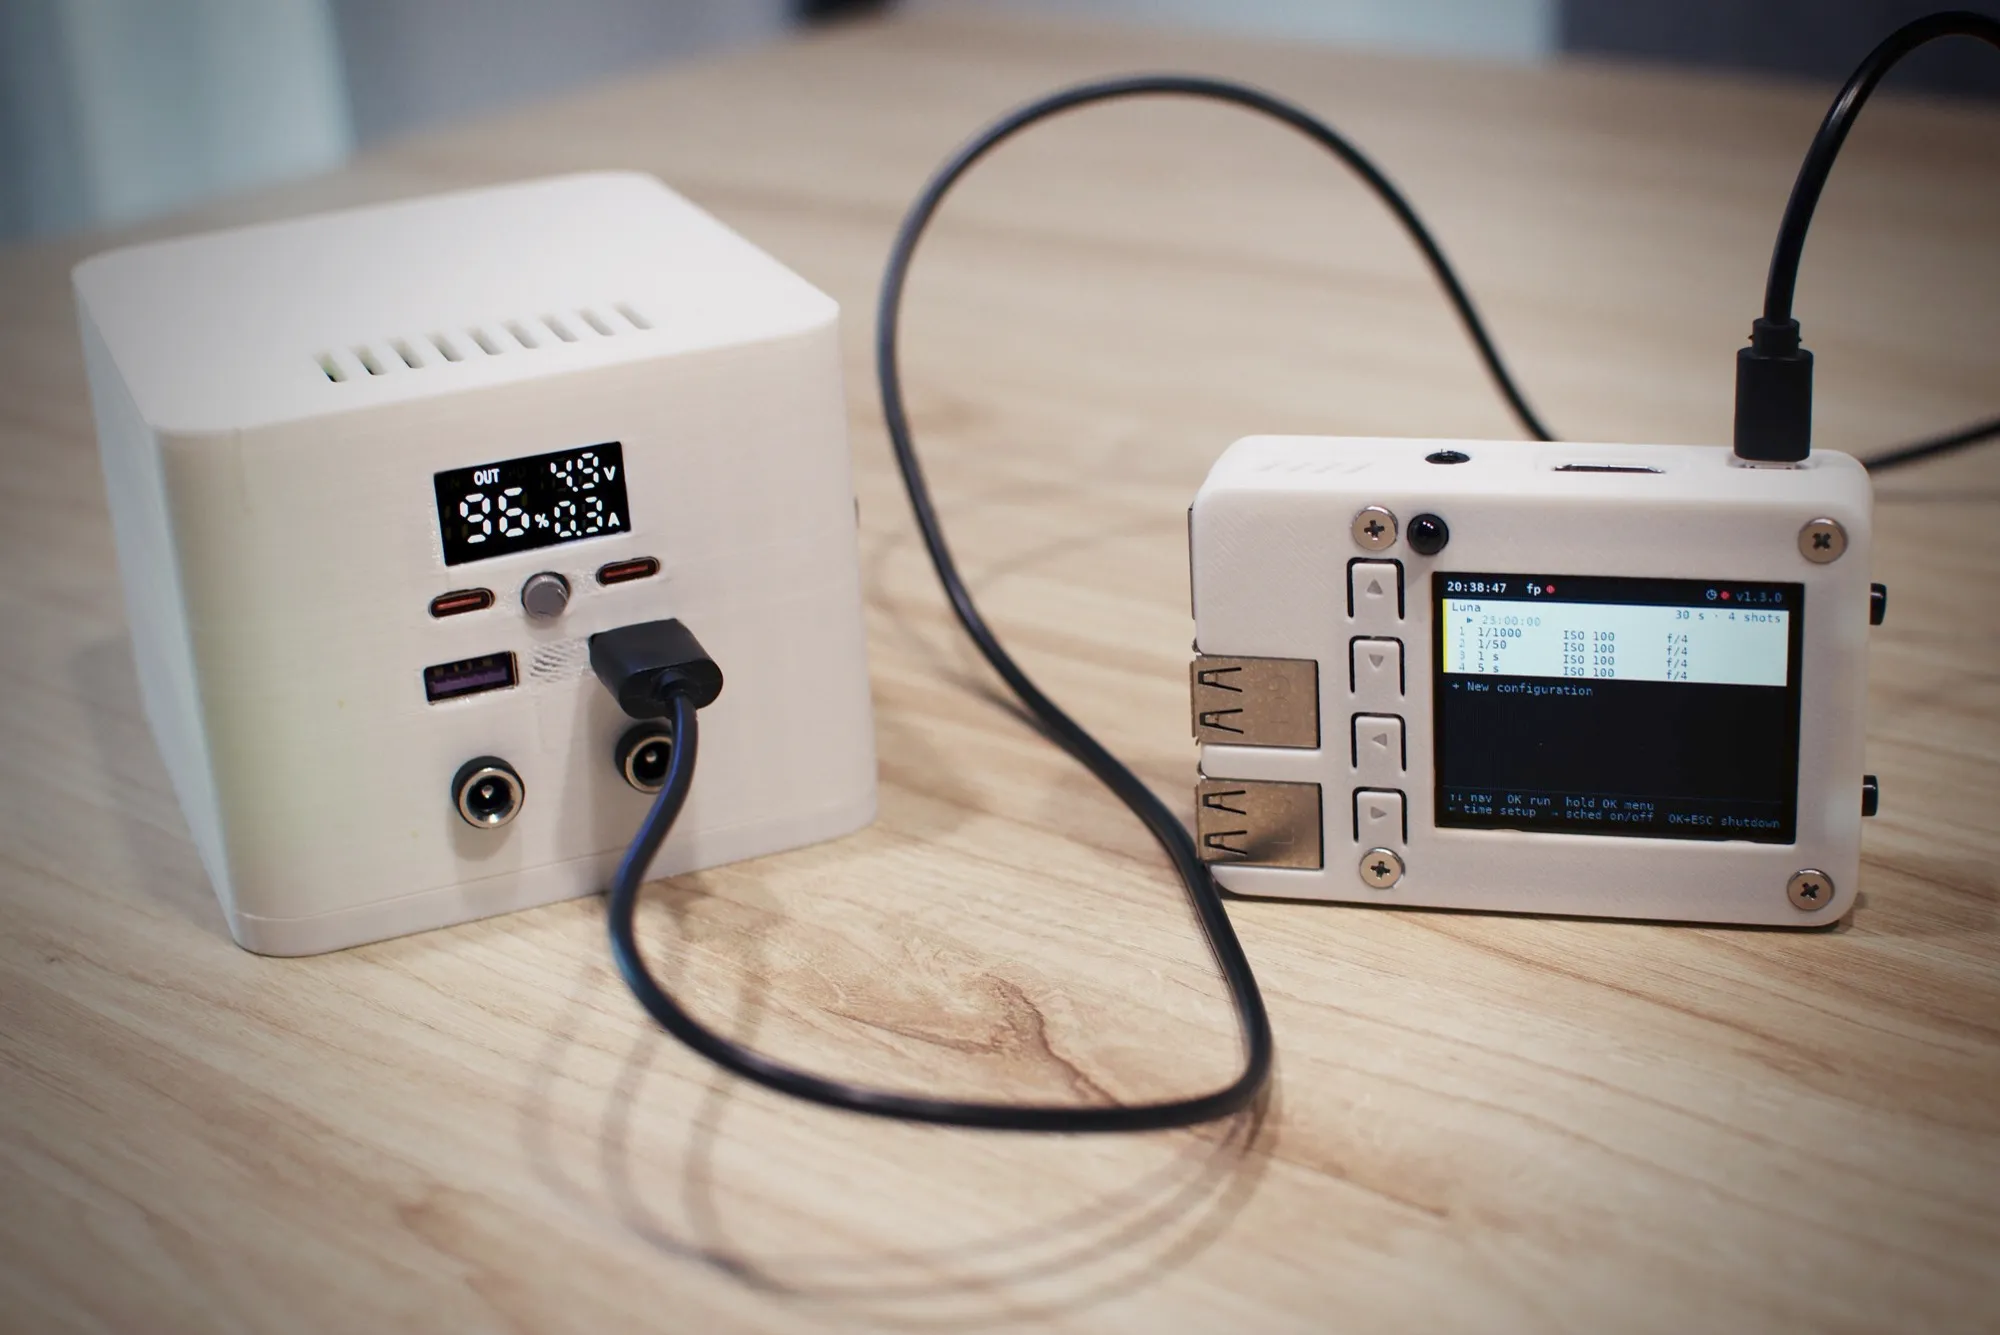
The power bank running the intervalometer.
The camera’s limits
The problems showed up when we started working out the exposures we would need, how much time we had for each of them, and what our camera could actually do.
Over PTP, the first version of the intervalometer could not fire more than one frame per second on the Sigma fp. That left us with more than 5 seconds for a complete bracket, and that is essentially the entire window of Baily’s beads and the diamond ring — so the risk of missing them was high.
The first thing we did was find the camera’s real limit by shooting it manually. In fast continuous mode the Sigma fp can rattle off bursts of 5 frames very quickly, because it has a buffer that holds 9 full-resolution DNGs. Once that buffer fills, the camera waits while it writes to the card. The best sustained rate we managed by hand was 2.3 shots/s, which works out at a complete bracket every 2.18s.
The trouble came when we tried to reproduce that over PTP. The camera would lock up, most likely a firmware bug. Every time a frame is taken the camera stores its metadata in a circular buffer of 30 slots, and if a burst happened to straddle the jump from the last slot back to the first, the body froze. The same thing never happened in continuous mode by hand, nor when firing one frame at a time over PTP.
Burst mode was essential to have any chance at Baily’s beads and the diamond ring in a single instantaneous HDR frame (merging the 5 shots), though it was no guarantee, since everything depended on exactly when the burst went off.
Given all that, we settled on a compromise aimed at maximising the odds:
- A MAX interval mode, where the camera takes bracketed frames one at a time — no risk of locking up — as fast as the hardware allows. This runs during totality and the transitions into and out of it, where there are too few seconds to waste any of them not shooting.
- A one-shot mode, which fires a complete bracket in burst mode synchronised to a specific instant. The shooting engine works to guarantee the circular buffer is in a safe position first, aborting the bracket in progress if it has to. A one-shot is a single bracket and then control returns to the previous configuration — in other words, it lets us slot a bracket inside another configuration while it runs. This is what would chase the beads and the ring around C2 and C3, and the earthshine during totality.
- A reversed bracket for the shot around C3, taking the slow frames first and the fast ones after, since there the scene goes from darker to brighter.
- A global exposure compensation of ±3 stops, so we could adjust everything at once without reconfiguring each configuration separately. Useful for last-minute corrections if our exposure calculations turned out to be off.
- Audio cues on certain configurations, to know when to pull the filter and when to put it back.
- And finally, manual configuration of the Wi-Fi, the clock and the C1–C4 contacts with their lunar limb corrections, so the timings could be adjusted on site with no internet.
We tested all of it many times and fixed things as they came up. We even ran timing rehearsals against Stellarium on a monitor, with the clocks synchronised, to check that the moments matched what we would see at the eclipse.
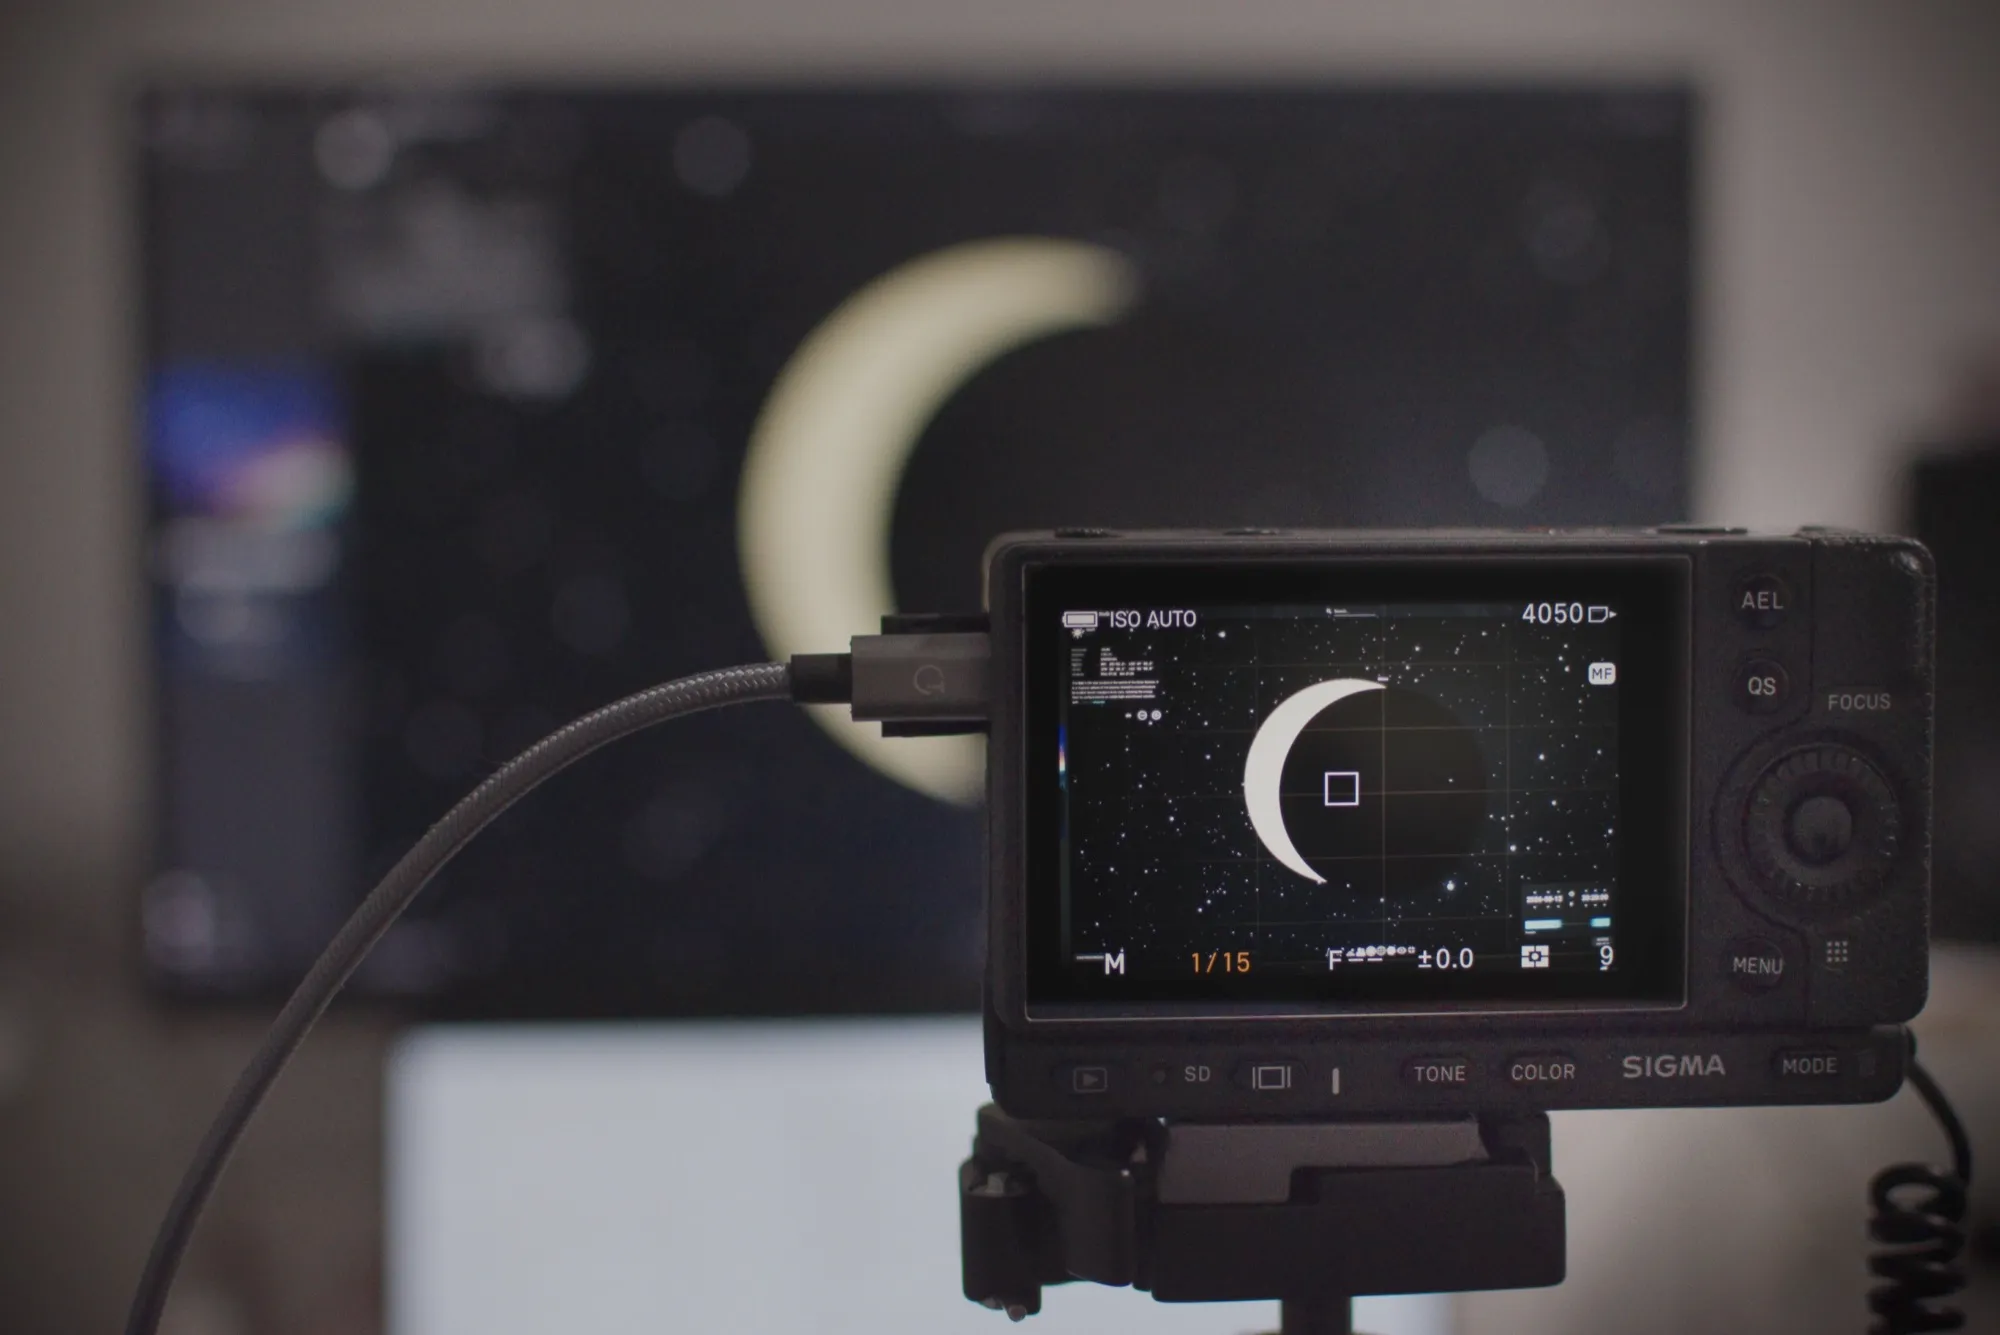
The dress rehearsal, against a monitor.
The capture plan
For the exposures we worked from Fred Espenak’s tables, with aggressive bracketing (3 EV between steps, since the Sigma fp has at least 11 stops of dynamic range) to leave enough room to lift shadows and pull back highlights.
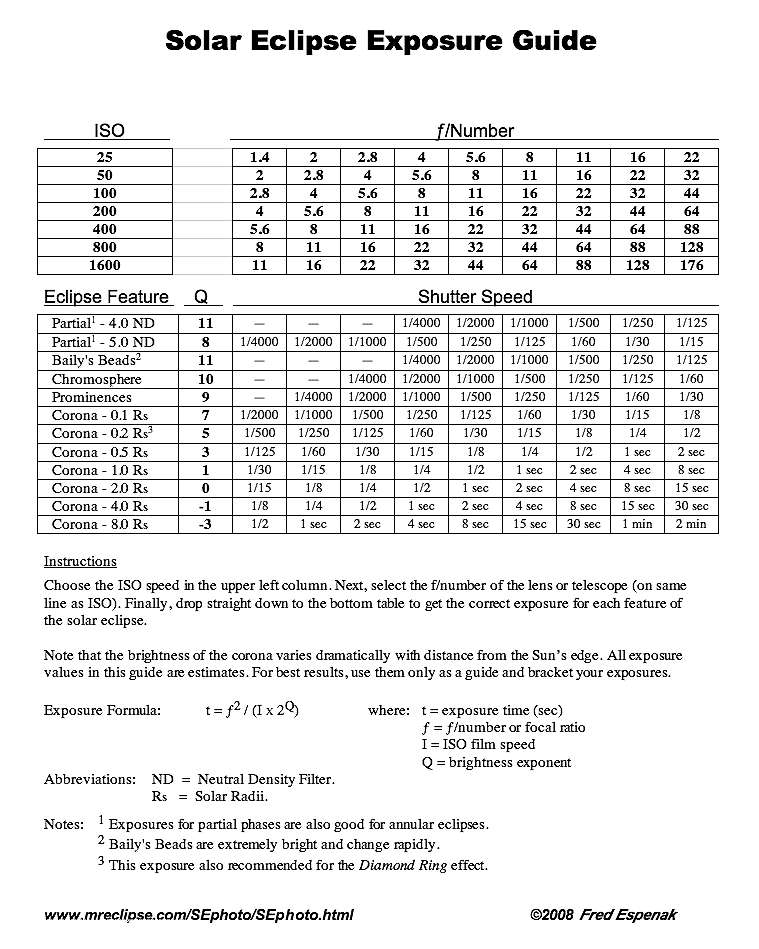
The only real test we could run beforehand was the partial phase, simply photographing the Sun at what we had estimated: 1/1000, ISO 640, f/11.8. The image held at 1/500, but by 1/400 and 1/320 the centre of the disc was clearly blown.
Everything else was theory. For totality we deliberately kept a very long exposure out of the bracket, because it stretches the whole cycle and cuts down how many samples fit into that scarce minute. The long frame ended up as its own shot, at a specific instant, as we’ll see further down.
From the four contacts the intervalometer derives five configurations, each covering a stretch of the eclipse. All of them at f/11.8, which is the Mak 127 at prime focus and never changes, and all with a conservative margin of +1.5 stops over Espenak’s value to allow for atmospheric extinction with the Sun so low.
And across the whole table there are only two sensitivities, ISO 100 and ISO 640, which are not arbitrary either: they are the Sigma fp’s two native ISOs. The sensor has dual conversion gain, so those are the two values where it gives its best dynamic range and its lowest noise, and any other ISO comes from applying gain on top of one of them. The 2.7 stops between them are also what separates the transition configuration from the totality one.
| Configuration | From | To | Filter | ISO | Shutter | Interval |
|---|---|---|---|---|---|---|
PARC-IN | C1−30s | C2−32s | yes | 640 | 1/1000 | 16s |
TRANS-IN | C2−32s | C2+12s | no | 100 | 1/8000 · 1/1000 · 1/125 · 1/15 · 1/2 | MAX |
TOTAL | C2+12s | C3−12s | no | 640 | 1/8000 · 1/1000 · 1/125 · 1/15 · 1/2 | MAX |
TRANS-OUT | C3−12s | C3+32s | no | 100 | 1/8000 · 1/1000 · 1/125 · 1/15 · 1/2 | MAX |
PARC-OUT | C3+32s | C4+30s | yes | 640 | 1/1000 | 16s |
The partial phases take a single frame with no bracketing, because the filtered disc spans about three stops against the camera’s eleven and there is nothing to merge. TRANS and TOTAL run the same bracket and differ only in ISO. The filter comes off at C2−32s and goes back on at C3+32s, and both deadlines are announced by five pips, one per second, followed by a long pip whose onset marks the exact instant — the same tones as a radio time signal.
Those five configurations have three one-shot frames interleaved among them, going after the special moments: Baily’s beads, the diamond ring and the earthshine.
Placing the synchronised shots
Taking the instants of C2 and C3 as exact (they come from the site’s precise coordinates with the lunar limb correction applied), and working on the premise that Baily’s beads end exactly at C2 and begin exactly at C3 and extend outwards from the contact by roughly a couple of seconds on either side, the question is where to put the one-shot frames that will catch them.
The intervalometer’s clock syncs against NTP servers when we give it internet through a phone hotspot. We estimated the error of that clock at around ±0.75s.
The clock error is the same for both contacts, so we looked for two instants that would guarantee at least one good frame despite any offset. The idea is to place them so that if the clock is right we get two good frames, and if it is off, at least one of them still lands.
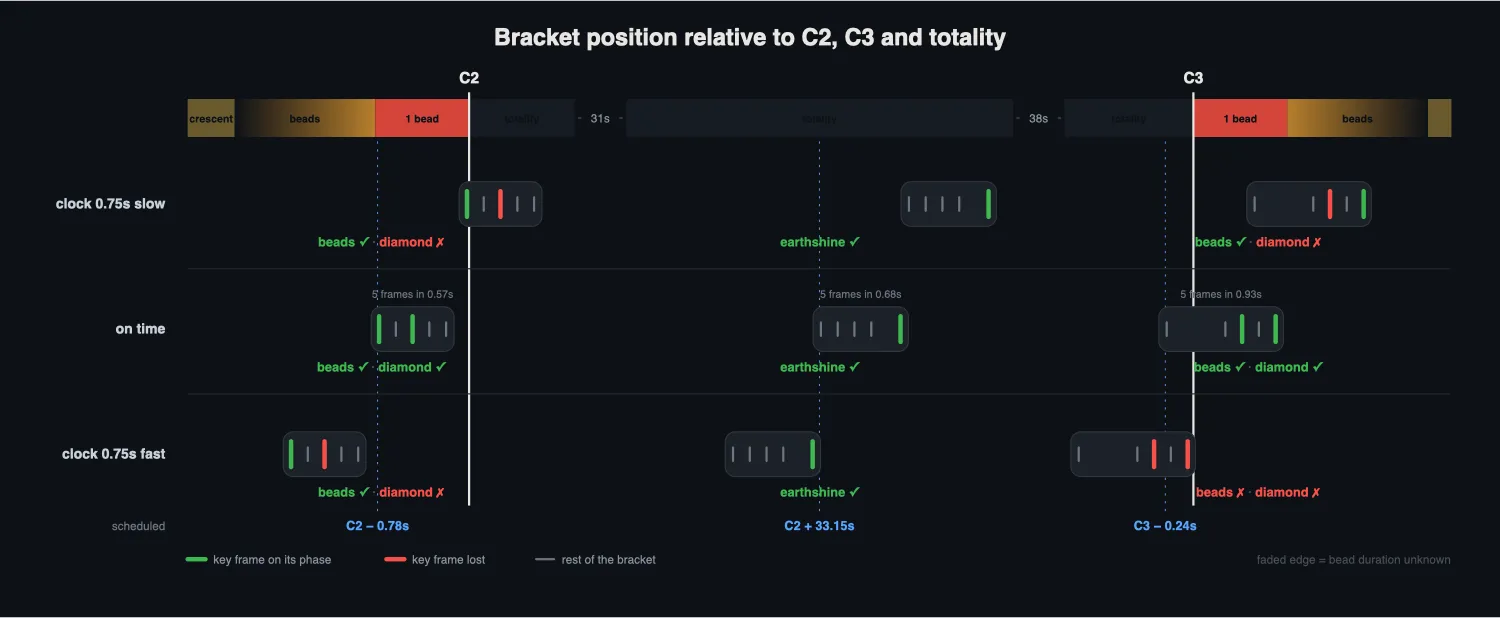
Effect of clock error on the one-shot frames.
These are the three, all without the filter and at f/11.8 like the rest:
| Shot | Instant | ISO | Bracket | Targets |
|---|---|---|---|---|
BEADS-C2 | C2−0.78s | 100 | 1/8000 · 1/1000 · 1/125 · 1/15 · 1/2 | beads on the way in, and the ring |
EARTHSHINE | mid-totality −3.9s | 640 | 1/2000 · 1/250 · 1/30 · 1/4 · 2s | earthshine |
DIAMOND-C3 | C3−0.24s | 100 | reversed: 1/2 · 1/15 · 1/125 · 1/1000 · 1/8000 | the ring, and beads on the way out |
The earthshine one is the only one of the three the clock cannot hurt: it sits in the middle of totality with more than half a minute of margin on either side. The other two are the critical ones. In the worst case we were counting on something salvageable turning up, either from the calculated one-shots or from the transition configurations.
Location and gear
We had put together a list of places to watch the eclipse from. Our priorities were easy parking and somewhere not too crowded, though there was no way to know that in advance. We built the list from whatever sources we could find online. One that proved especially useful came from the Agrupación Zamorana de Astronomía, the local astronomy association, which listed wide open areas suitable for viewing.
We dropped markers in Google Maps and shortlisted a few candidates from the Street View imagery.
Before setting off we laid out all the gear we were taking on a table, so as not to forget anything, noting down which bag or case each item went into.
We packed spare cables, spare batteries and even a cloned copy of the Raspberry Pi’s SD card, in case a sudden power cut corrupted the system.
We also carried extra equipment to shoot the eclipse wide and to film the process. And, of course, the eclipse glasses, the only truly essential piece of kit in the whole setup.
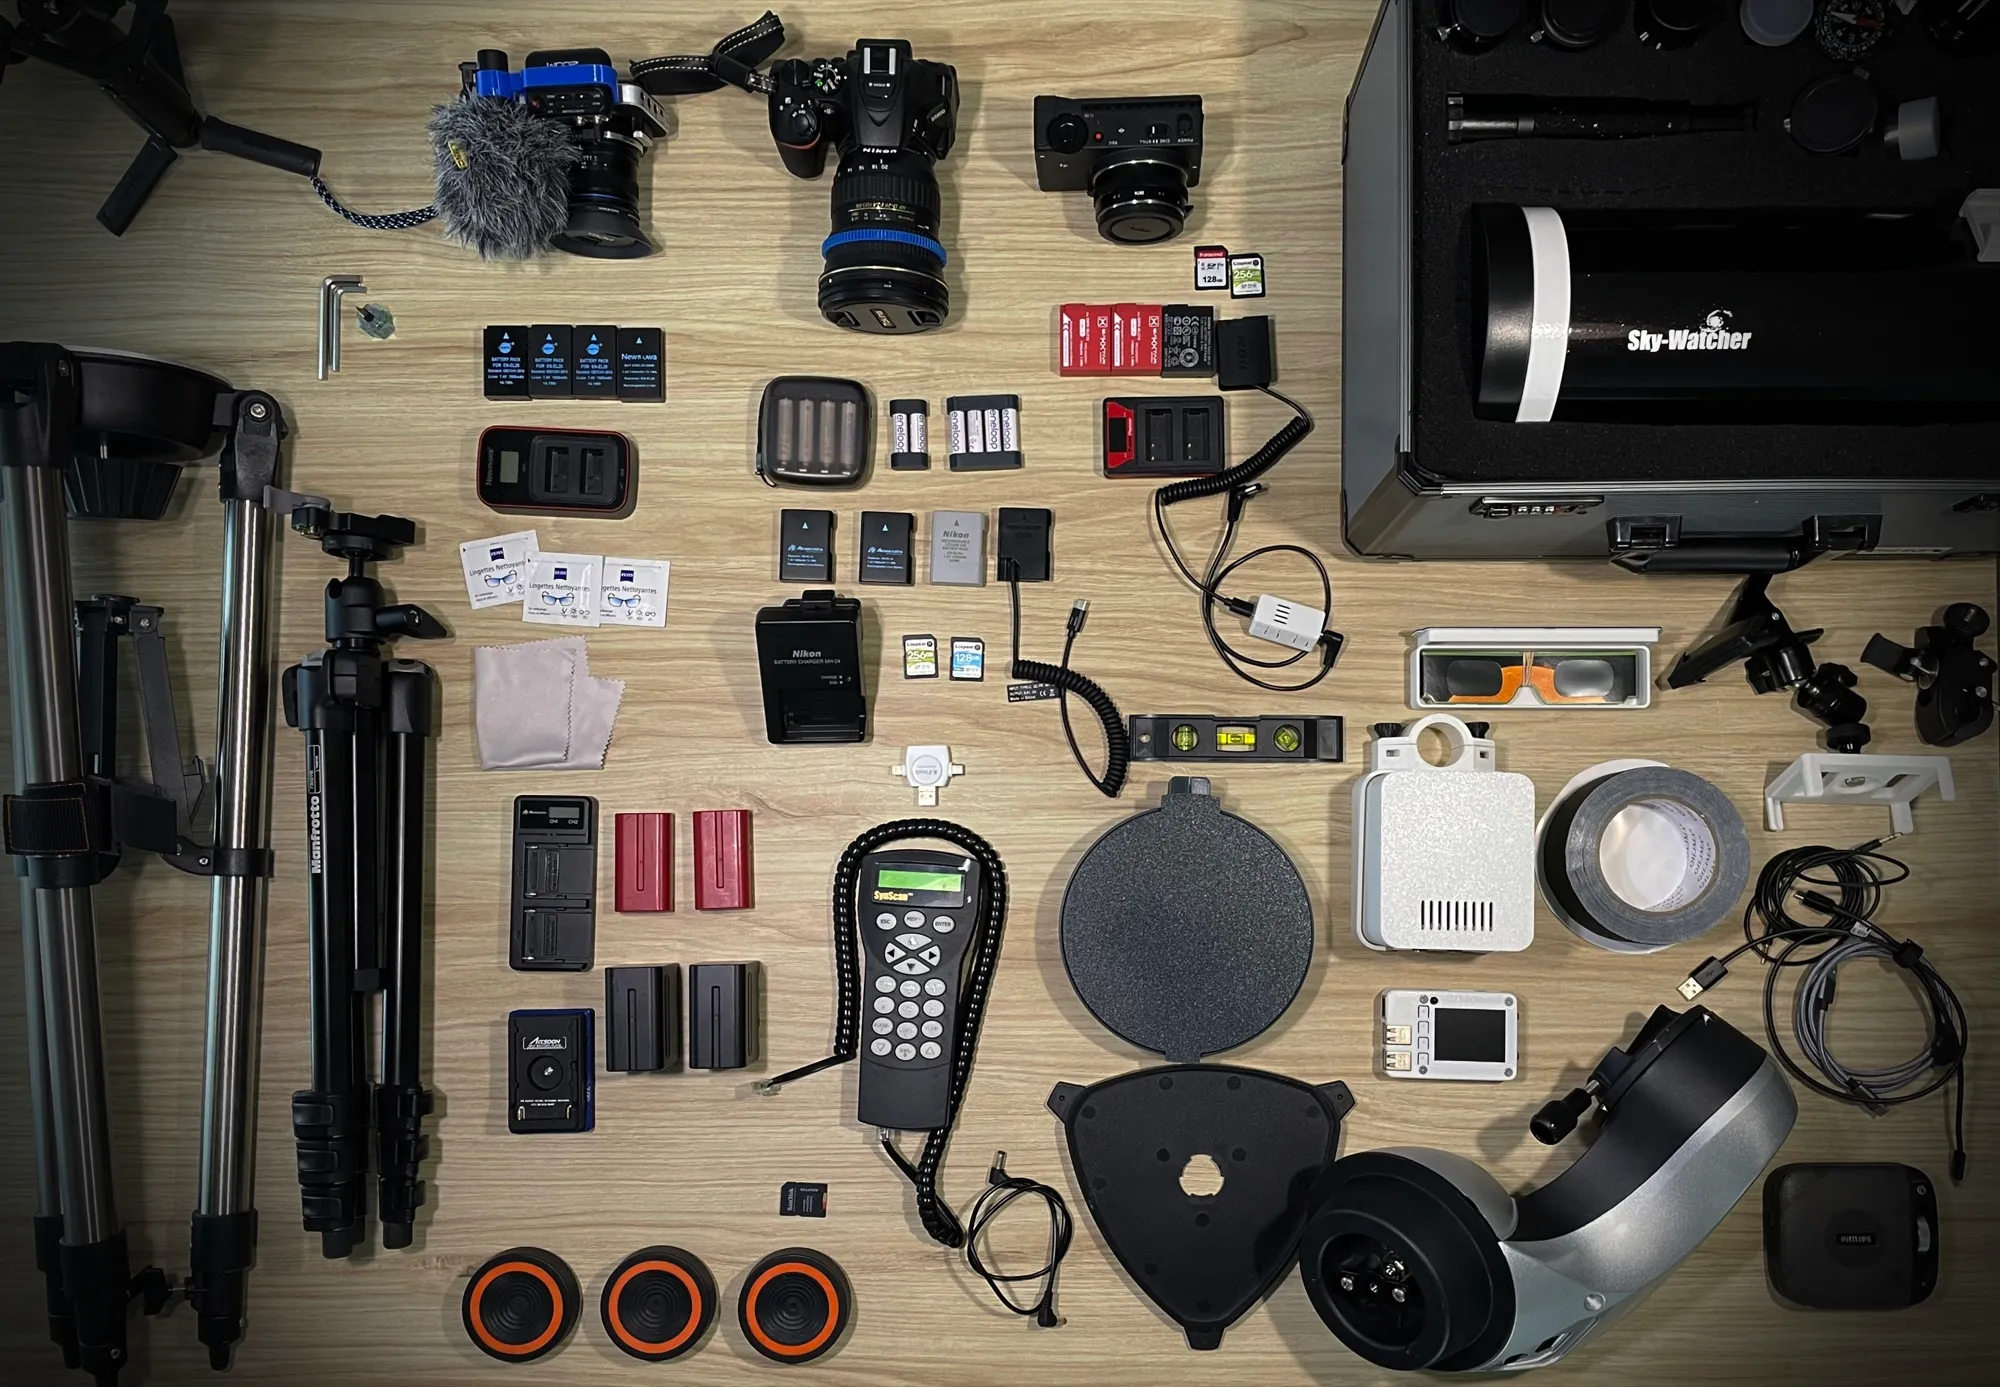
The full kit.
The day before
Our base was the city of Zamora, so everything moved by car from there. We spent the afternoon before driving round the best candidates we had identified, to see on the ground what photographs cannot tell you — whether the horizon really was clear, whether crowds looked likely, and whether we could park. Along the way we noted down a few spots that had not been on the list.
The last one we visited was the Otero de Sariegos observatory, in the Villafáfila Lagoons Nature Reserve, and that ended the search. Good parking, firm ground to set up on, and a spectacular setting beside the lagoon.
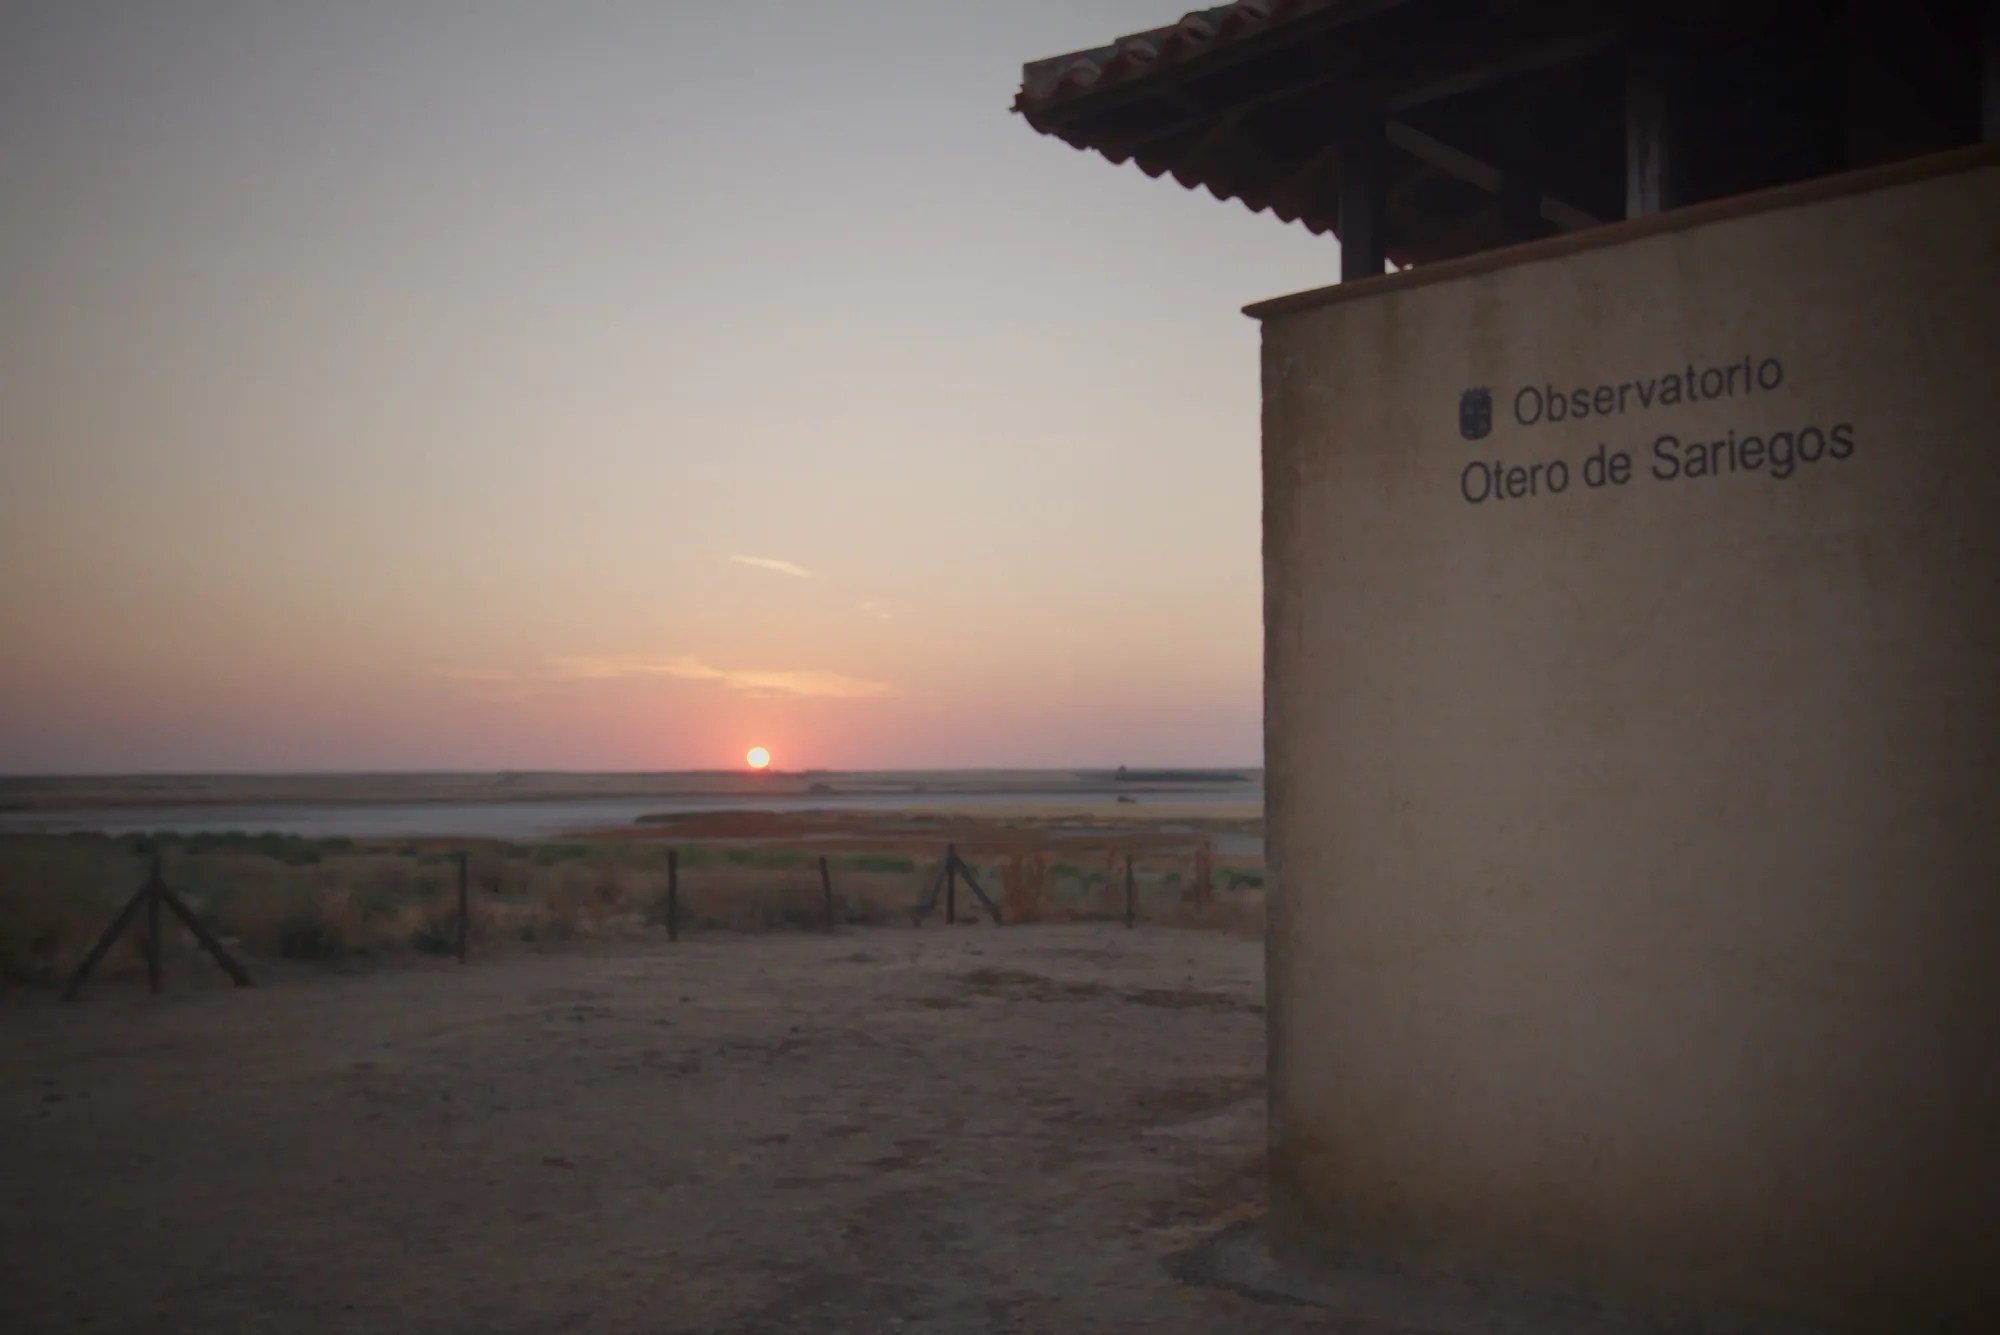
The day before, from the chosen spot. The Sun sets almost exactly where the eclipse would be, so the sunset doubles as a check on the horizon.
With the site settled, the contacts could be fixed, since they depend on the exact coordinates. We took them from Xavier Jubier’s map and entered them into the intervalometer that same night, which derives the eight entries of the plan from them: the five configurations and the three synchronised shots. They stayed editable in case the location changed at the last minute.
One detail about Jubier’s map. Along with latitude and longitude, it takes the observer’s altitude as a URL parameter — the
&Elv=679in our link — and factors it into the calculation: the panel itself shows it in the table header, next to the ΔT value. It’s worth passing, because elevation feeds into the geometry of the contacts and sharpens the instants.
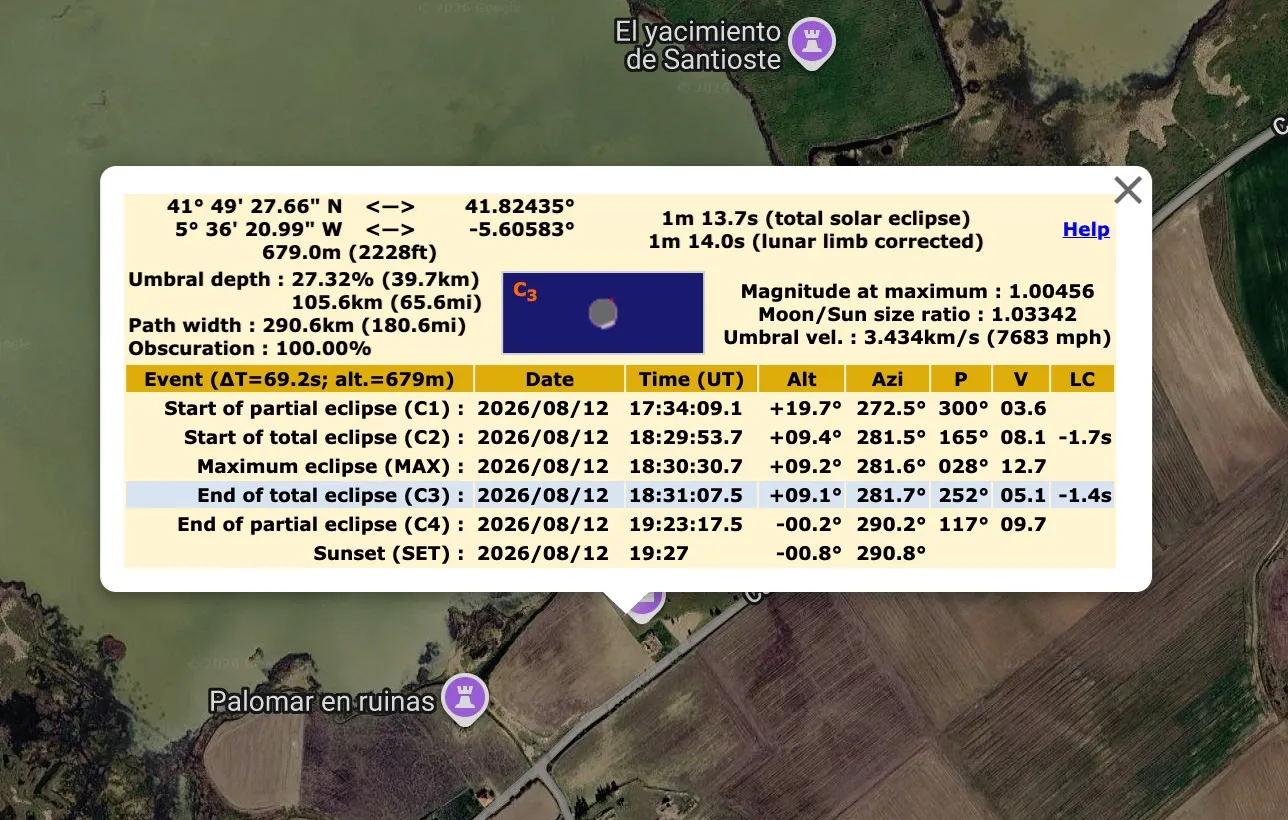
Feeding the exact point into Xavier Jubier’s map gives the four contacts with their limb correction, and 1m 14.0s of totality.
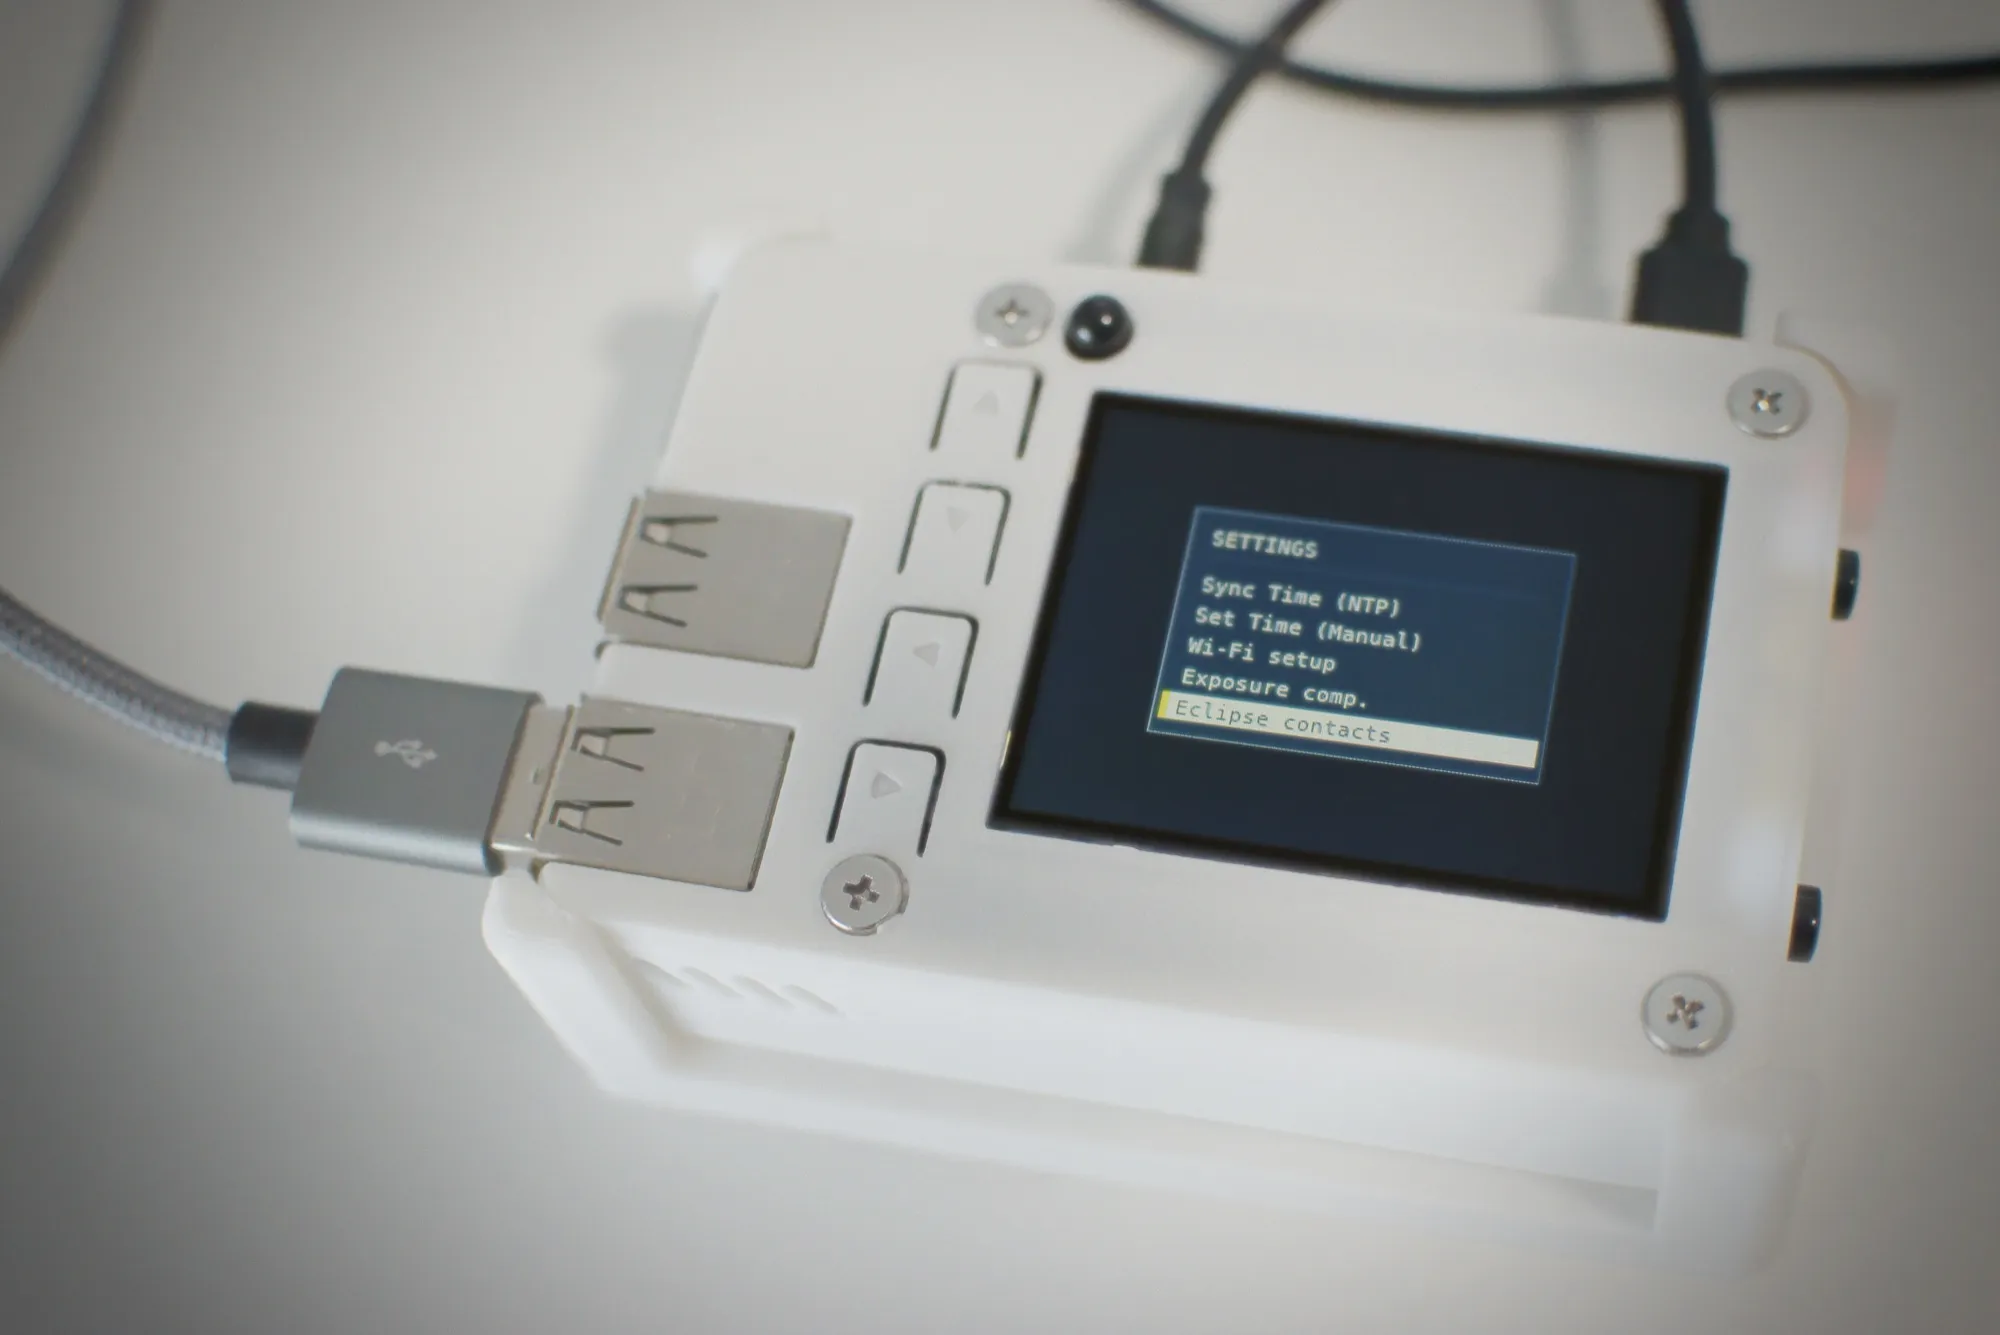
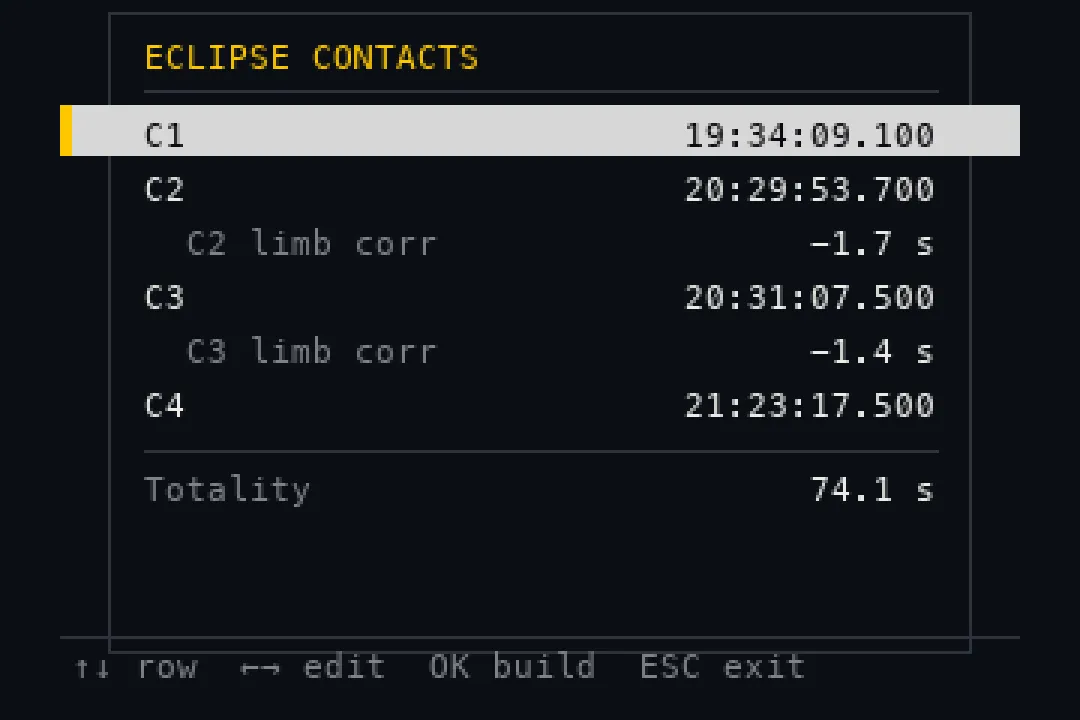
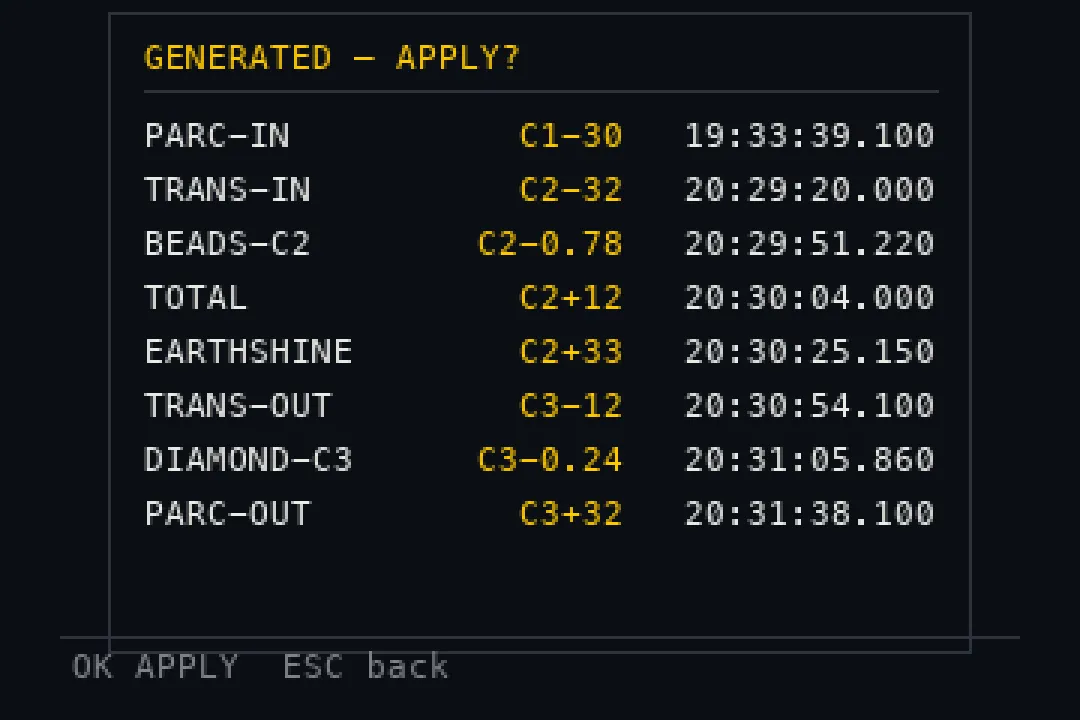
The four contacts go in by hand on the device itself, no laptop involved, and out come the eight configurations with their times.
Eclipse day
We went with time to spare — four or five hours before the partial phase began we were already there. There were people about, but nobody fancied planting themselves in full sun with the whole afternoon ahead, so the front row beside the lagoon was left to us. The price was enduring an August day in Zamora while trying to keep two parasols upright.
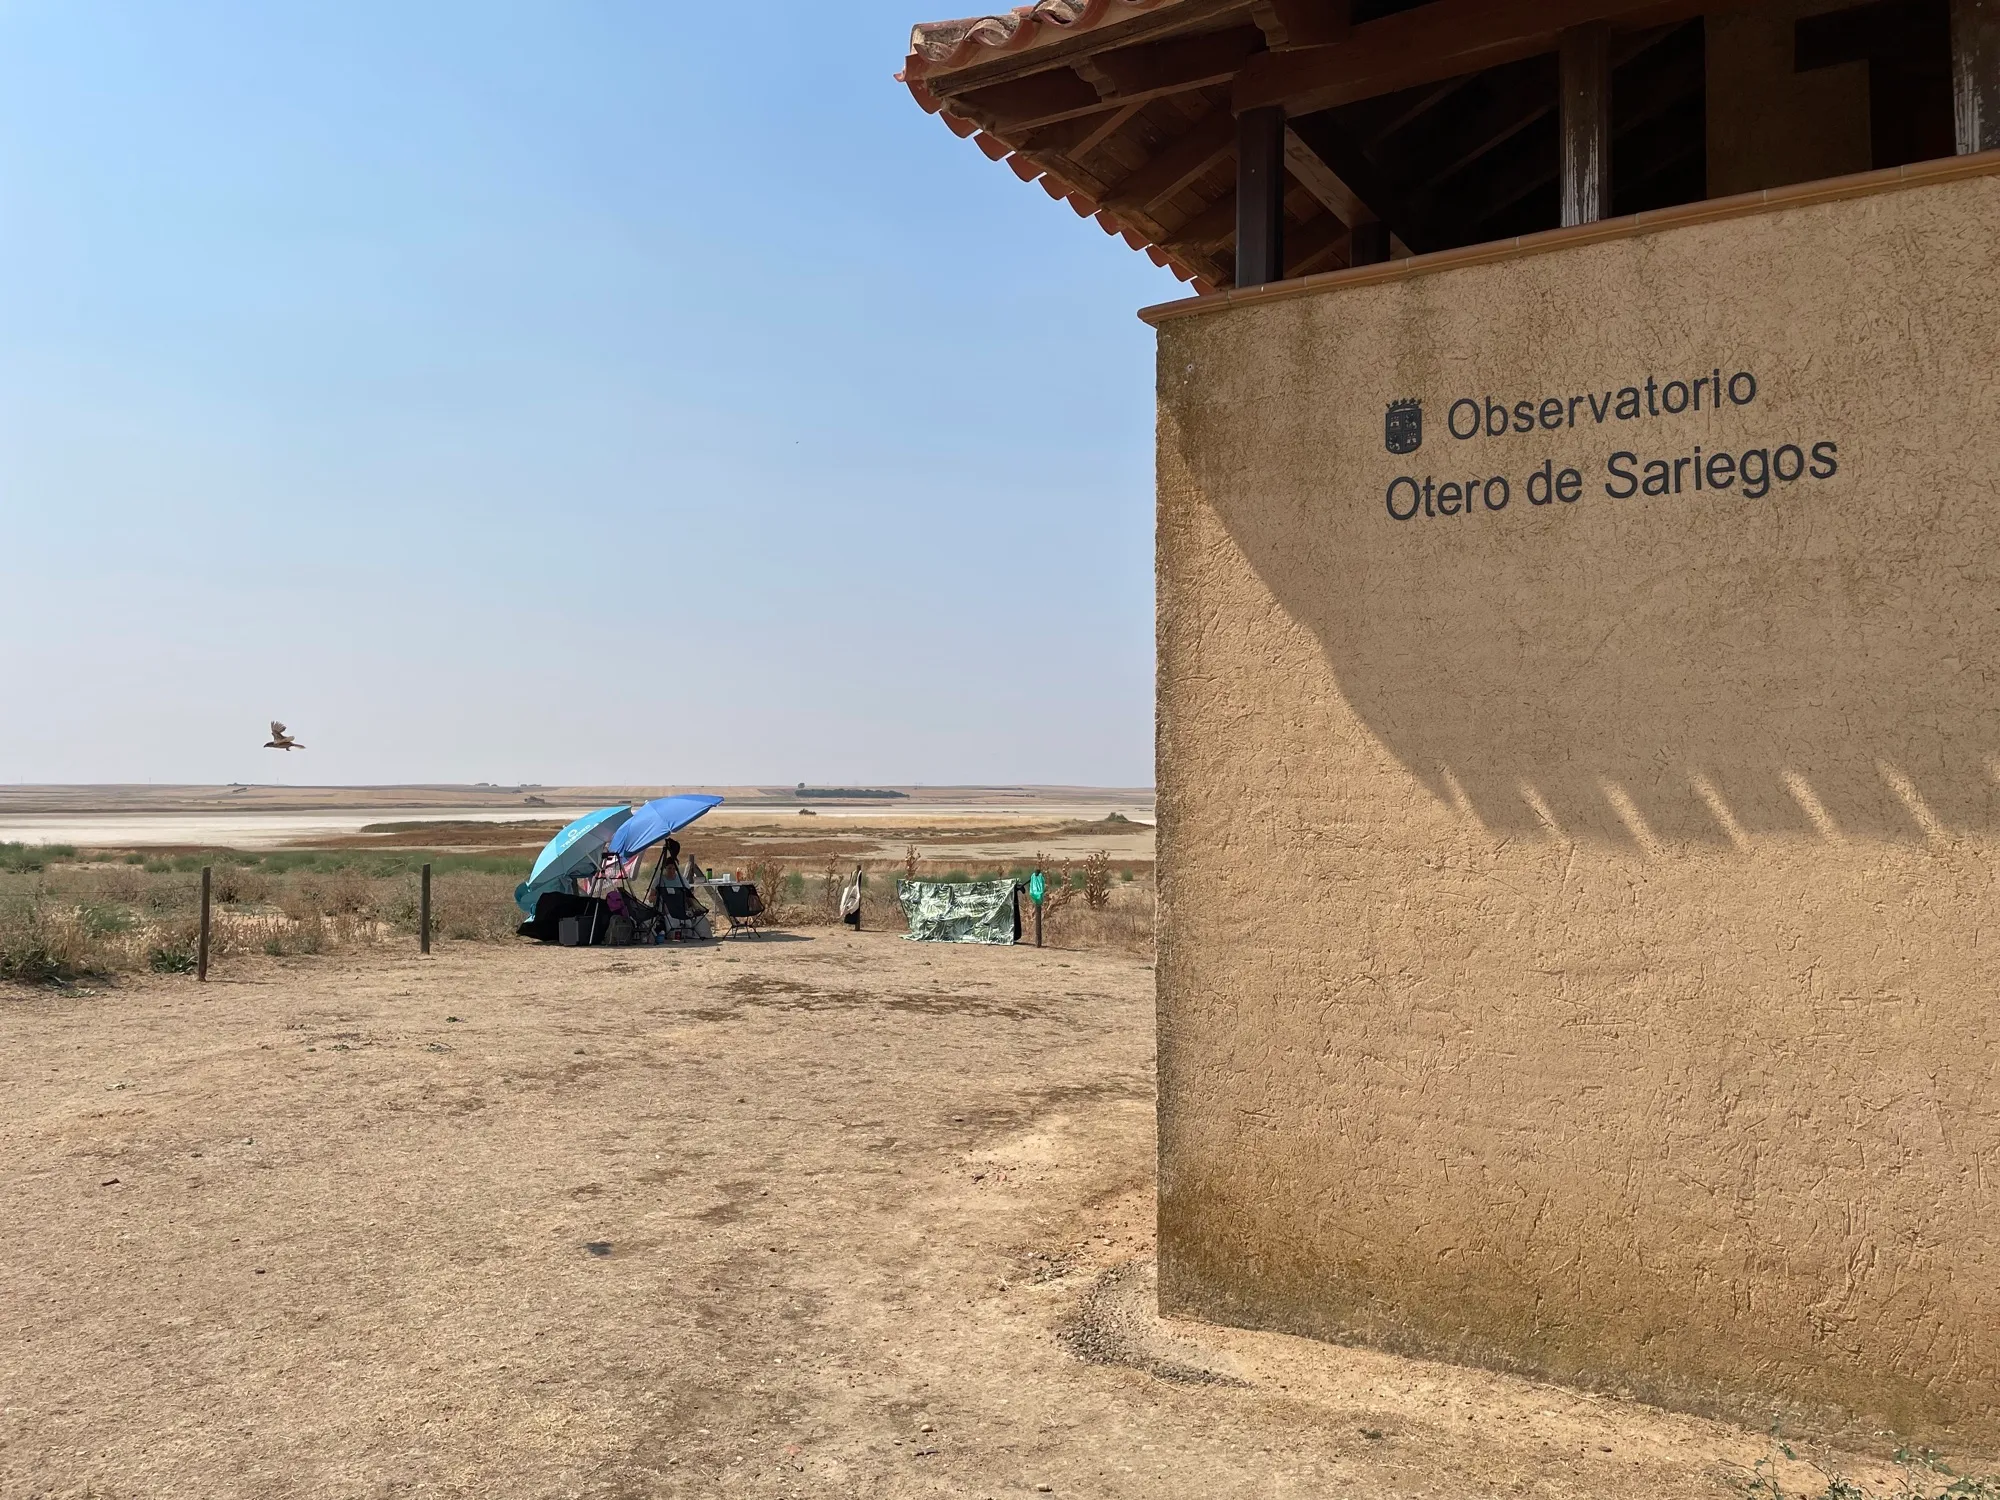
Our corner, claimed from early in the afternoon.
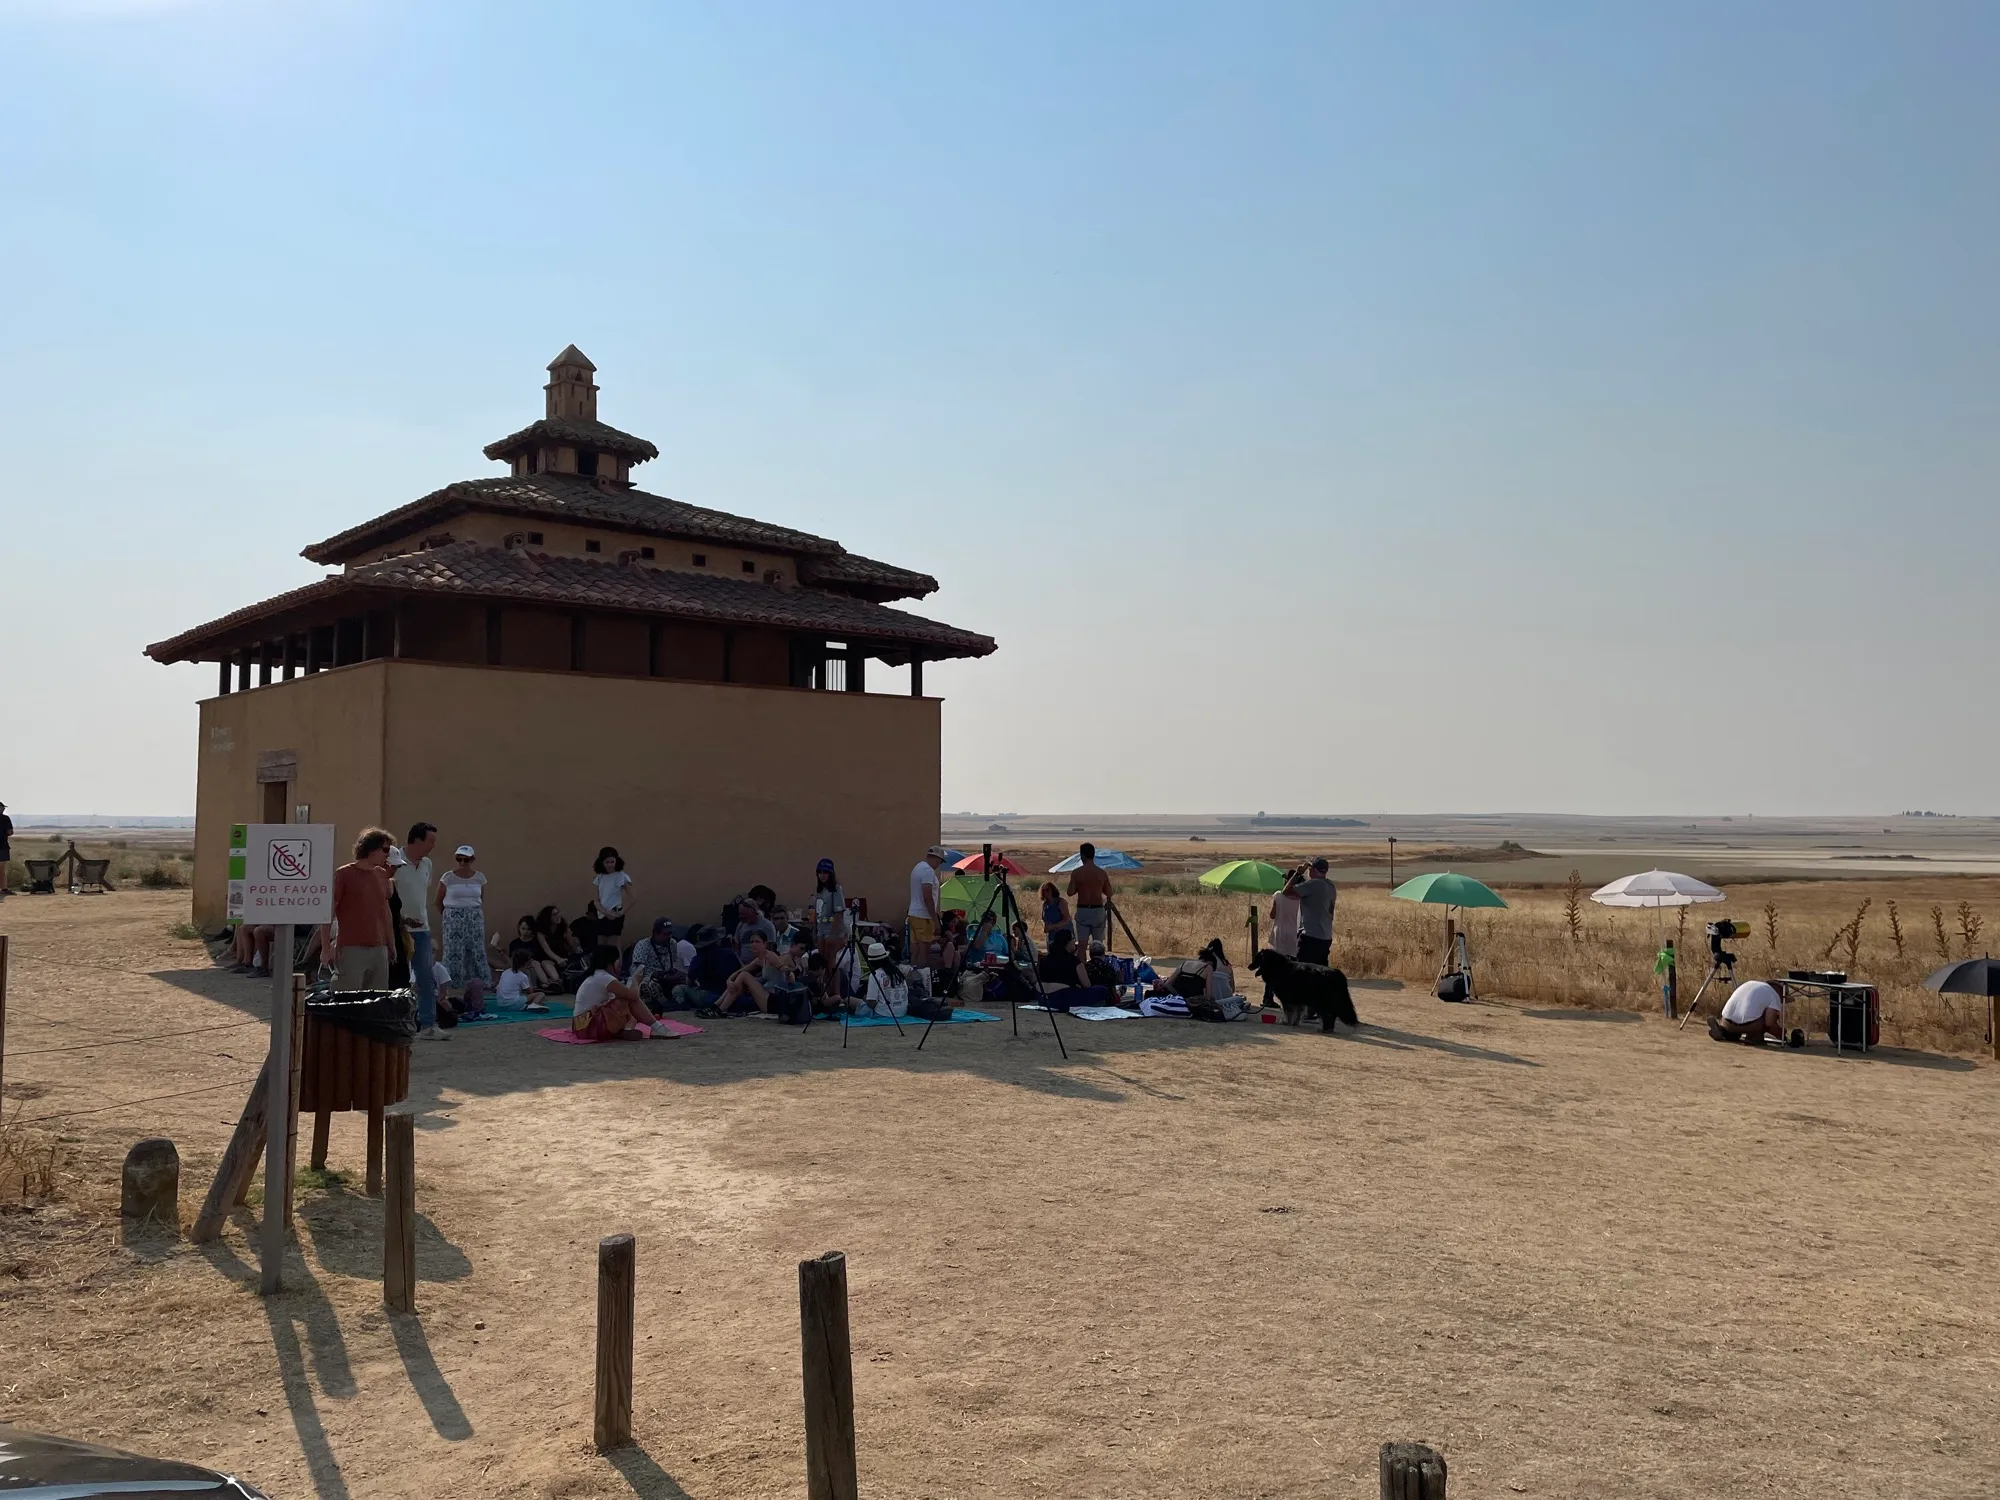
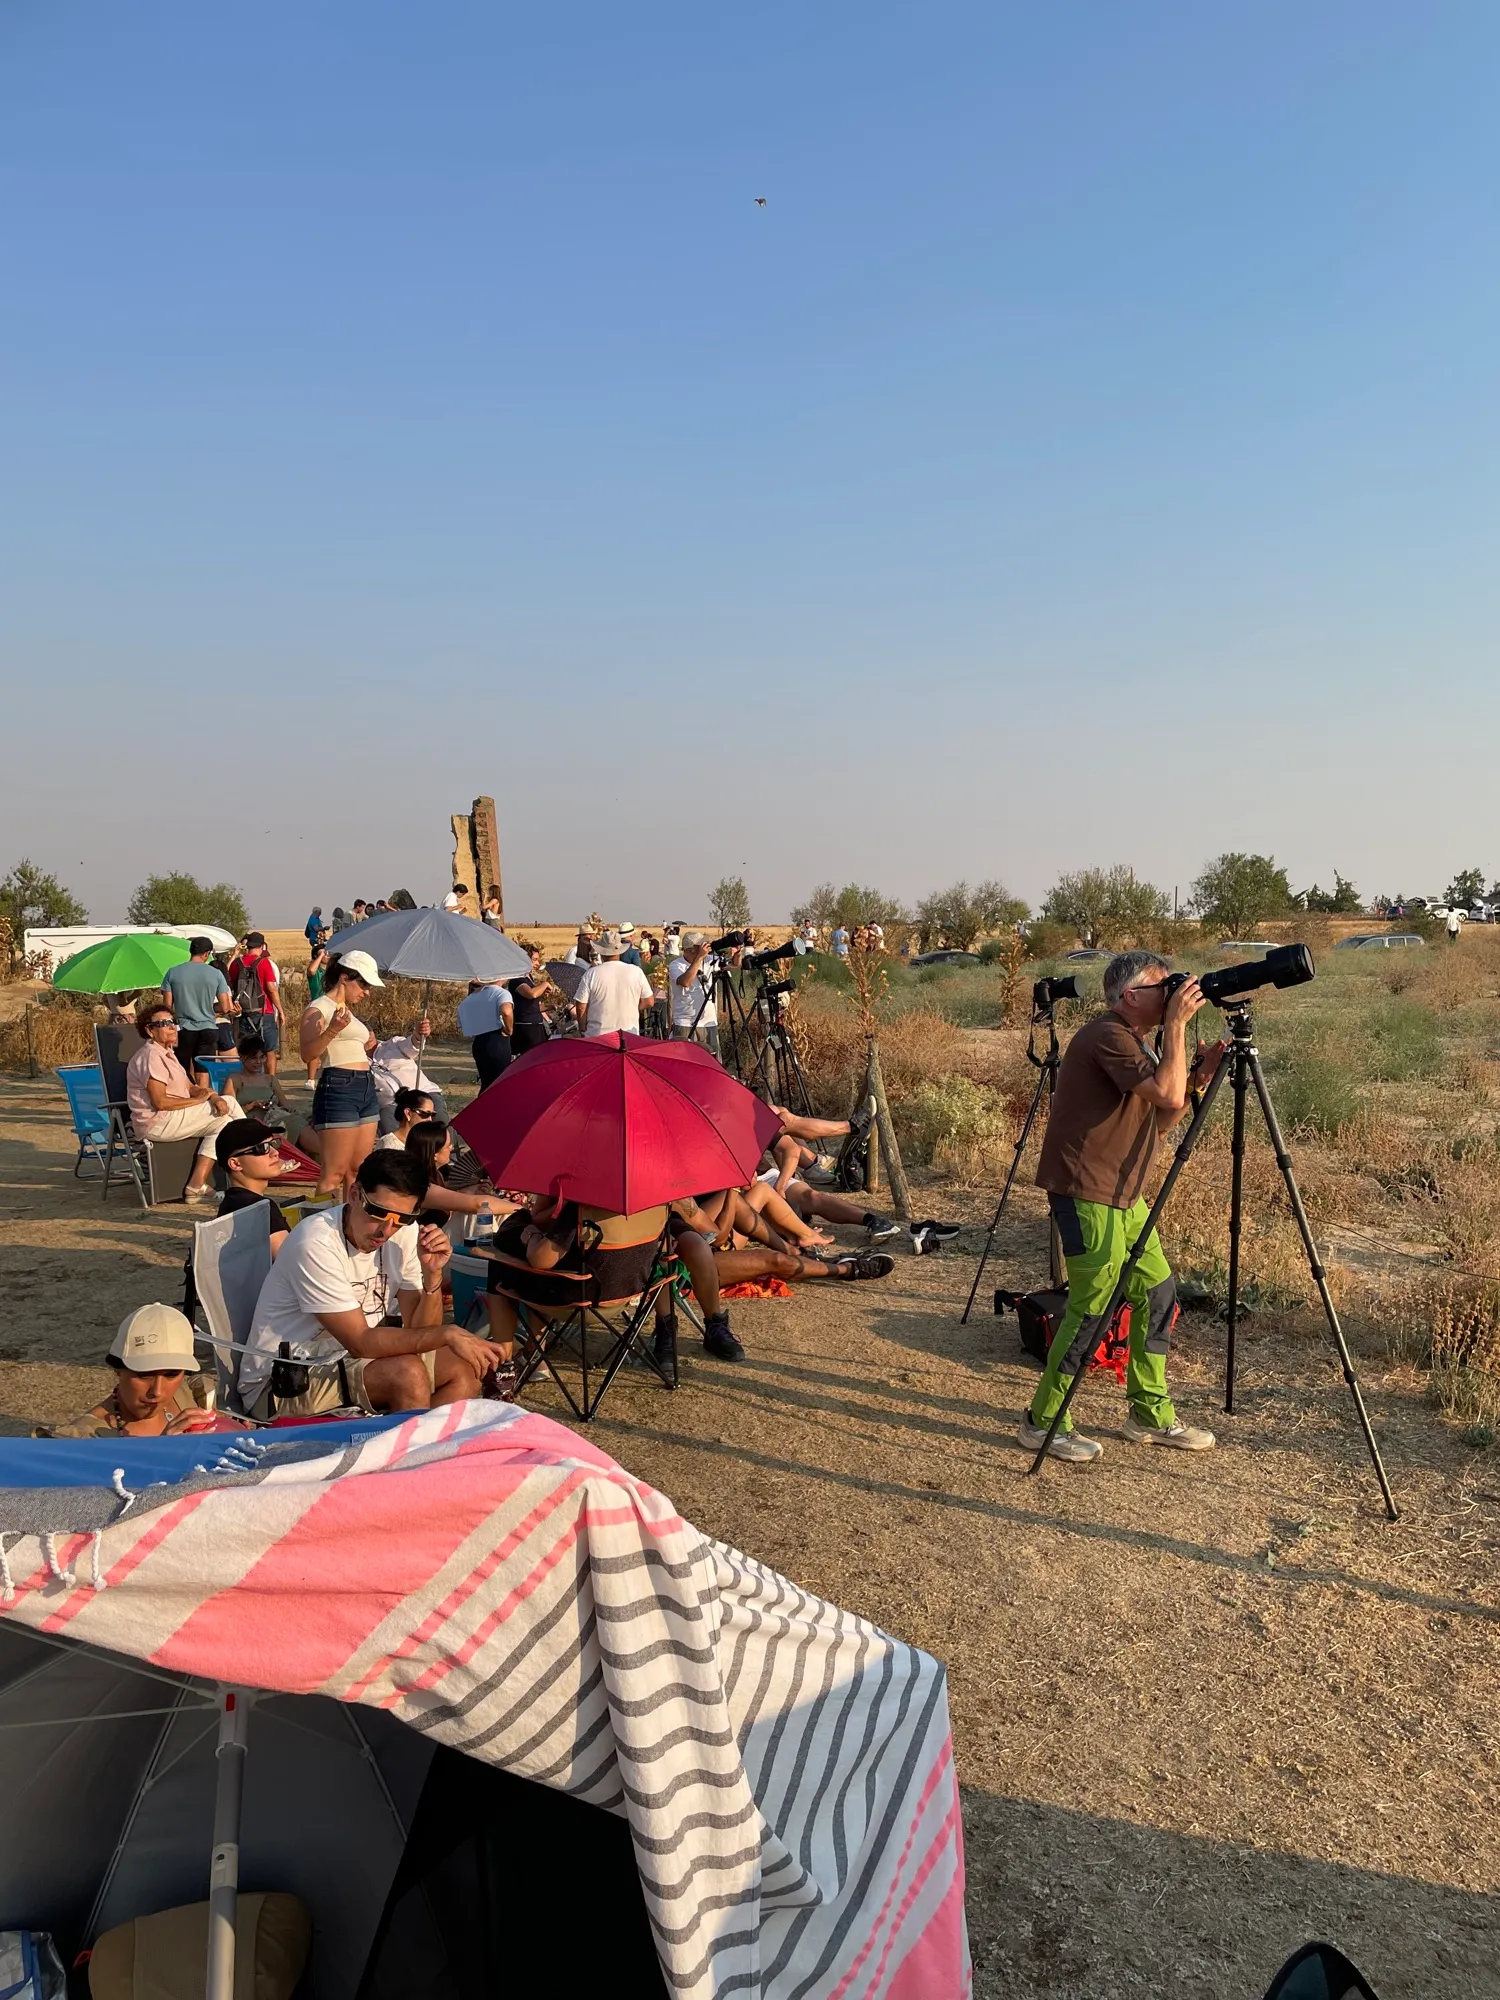
Everyone else went for the shade of the observatory. As the hour approached we ended up surrounded, some of them with telephotos of their own.
The setup is two independent rigs. The Nikon D5600 with the Tokina 11-20mm f/2.8 on its own tripod for the wide frame, bracketing mode ready to fire by hand. And the Mak 127 with the Sigma fp, running on its own under the intervalometer.
The telescope needed levelling, configuring and focusing. Manual focus in full sun turned out to be the hardest part of the whole setup, because the screen is difficult to see and because touching the focus dial moves the telescope, so every adjustment shook the image. Since the site was the same one we had settled on the night before, the contacts did not need changing. I checked them against the Solar Eclipse Timer app and found small differences. In the end I kept Xavier Jubier’s numbers, which were the ones already loaded.
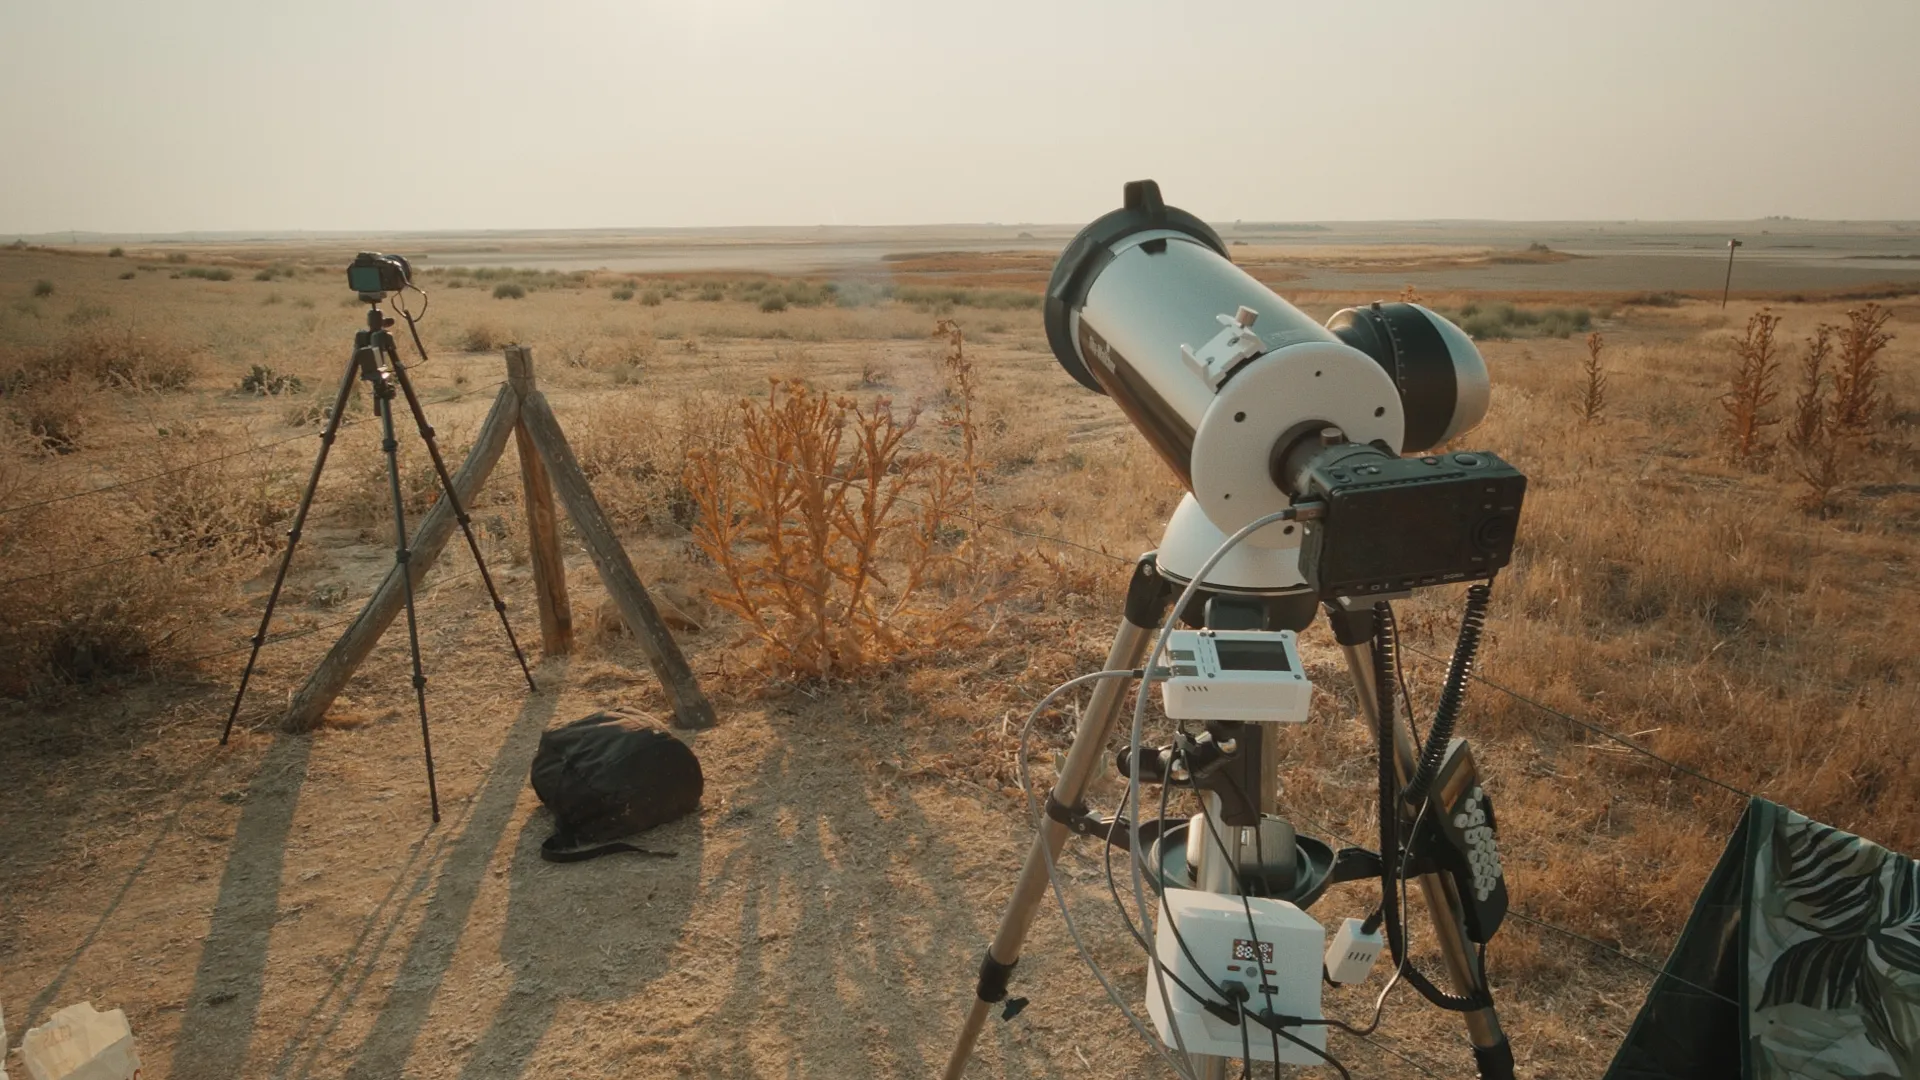
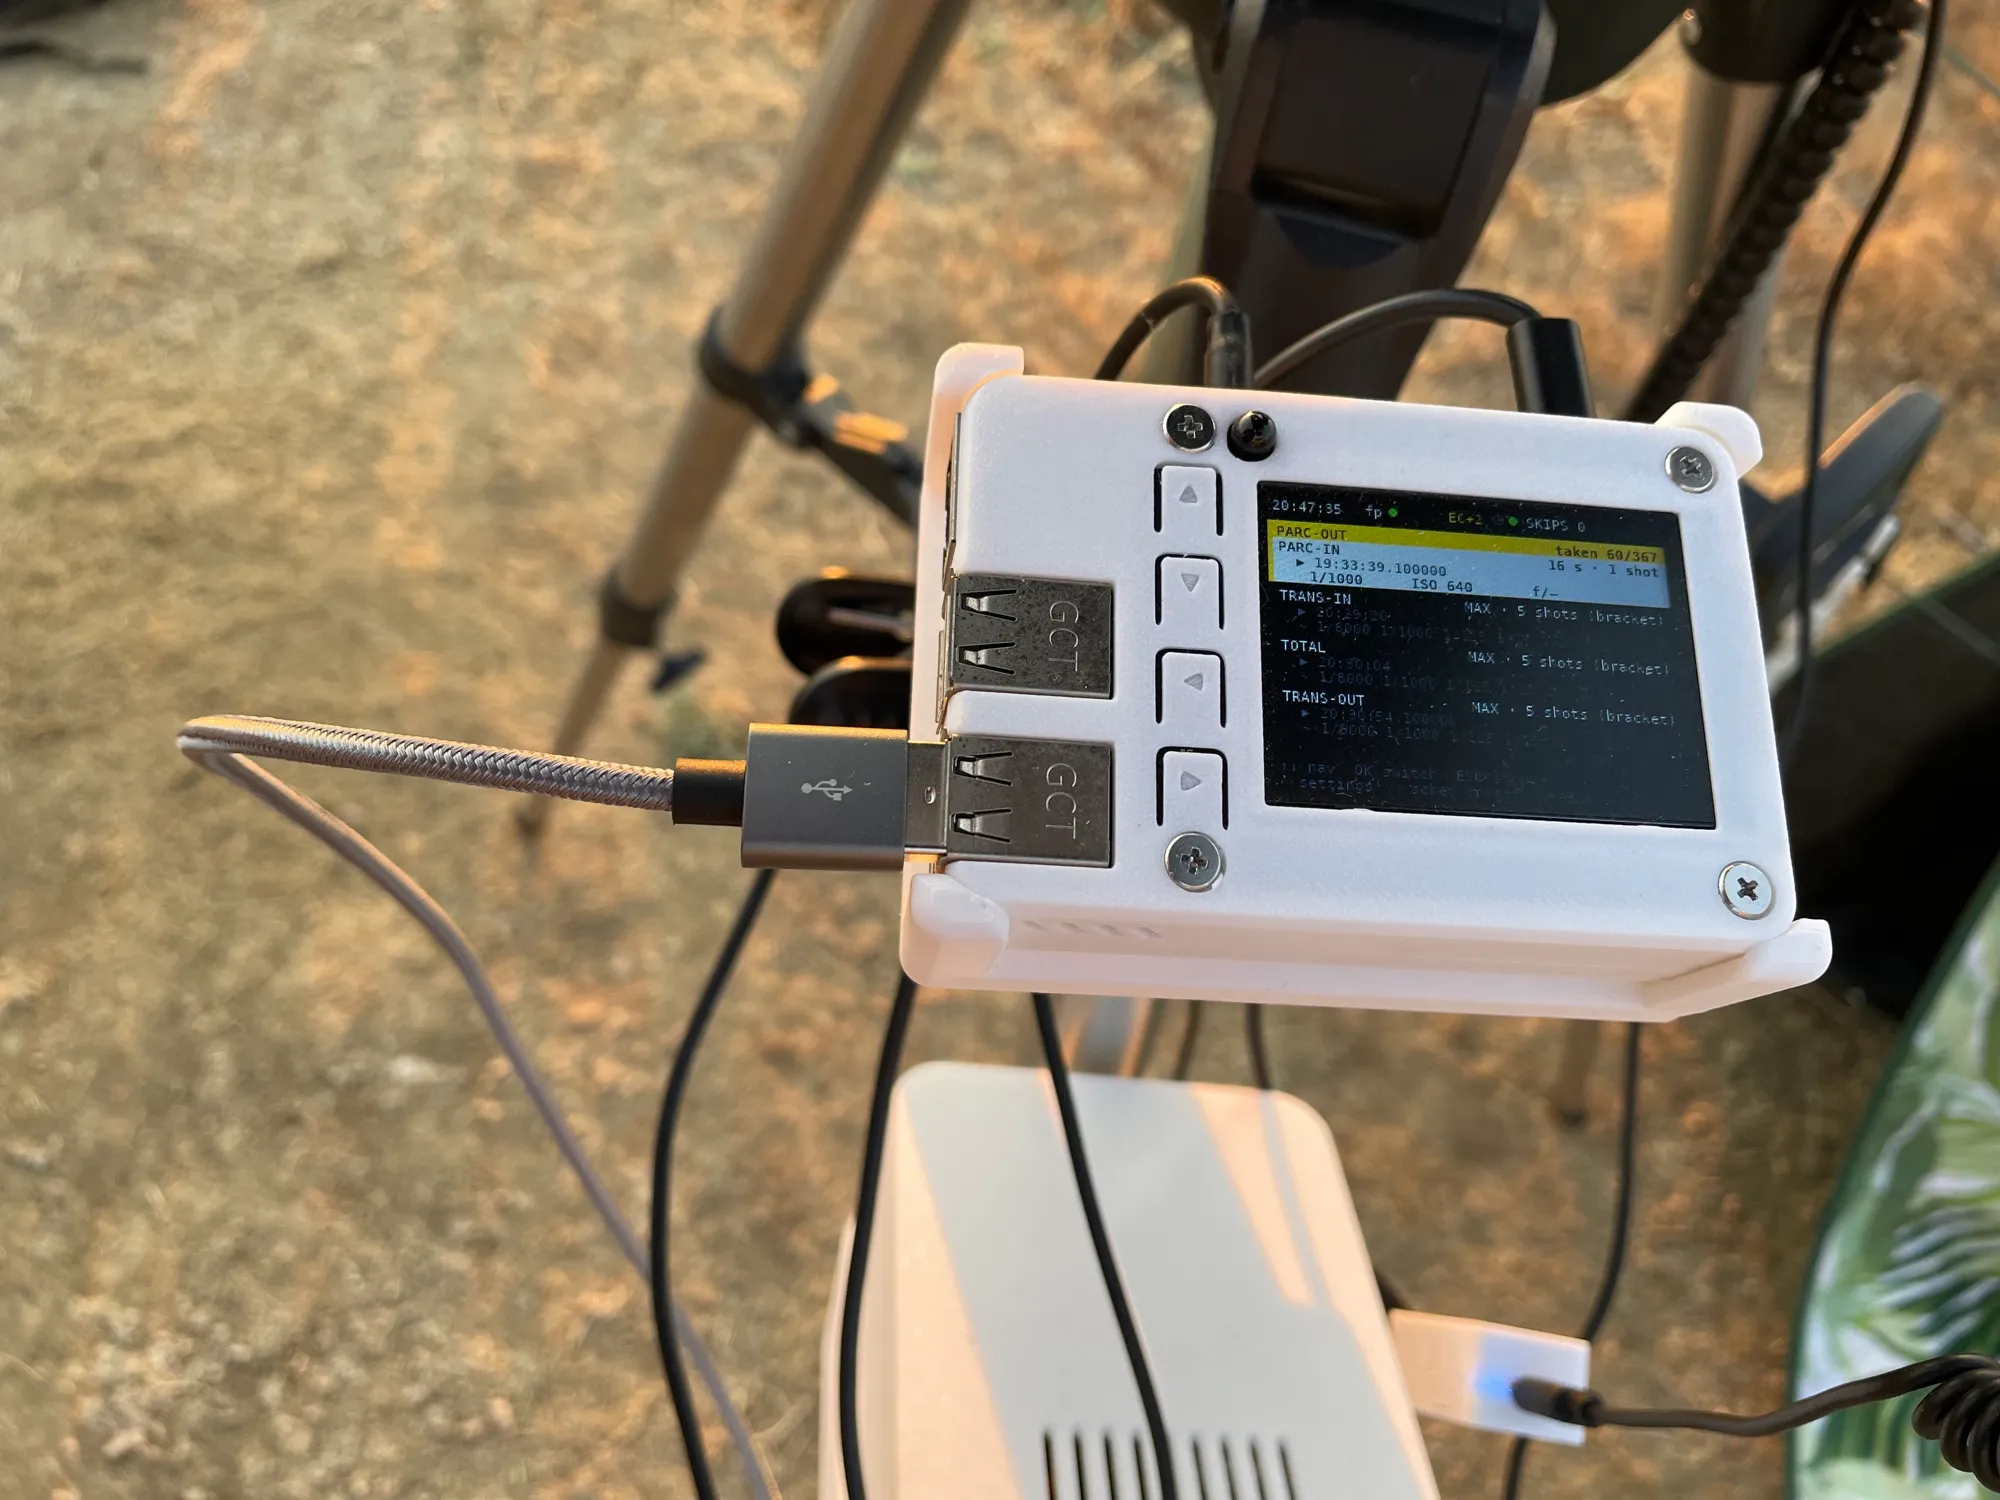
Both rigs up, and the intervalometer already working through the loaded sequence.
The first-contact pip sounds and the Sigma starts shooting on its own. The partial phase was uneventful. The only thing that gave trouble was the mount, which drifted enough that the Sun had to be recentred every few minutes.
The moment to pull the filter approaches. On the camera screen there is only a thin arc left and you can tell how little light there is. I get the Nikon ready to shoot through totality. The pips announcing the configuration change begin, and I pull the filter exactly on cue, on the last pip.
And then I go to the Nikon. The sky can be looked at directly now. I shoot brackets and work the exposure dial to repeat them around different centres.
I watch the eclipse until the brightness starts to come back, and that is when I stop looking. I get ready to put the filter back, the pips start again and I seat it on the last pip.
Through the second partial phase the Sun looked underexposed, so I raised the exposure compensation by two stops. And it kept fading. I took it to three, which is the ceiling, until there was nothing for it but to change the configuration and lengthen the exposure outright. In the end, with the Sun very low and coming out black even at exposures of several seconds, I took the filter off for the last frames.
The result
The unknowns this article opened with were cleared up the moment we saw what the camera had recorded. It was a complete success, because plenty could have gone wrong: something as simple as a forgotten cable, a miscalculation in the exposures or the timings, a software bug — and the software had changes as late as the day before — or the camera’s own sensor not holding up. The fact is that there was one opportunity and it worked.
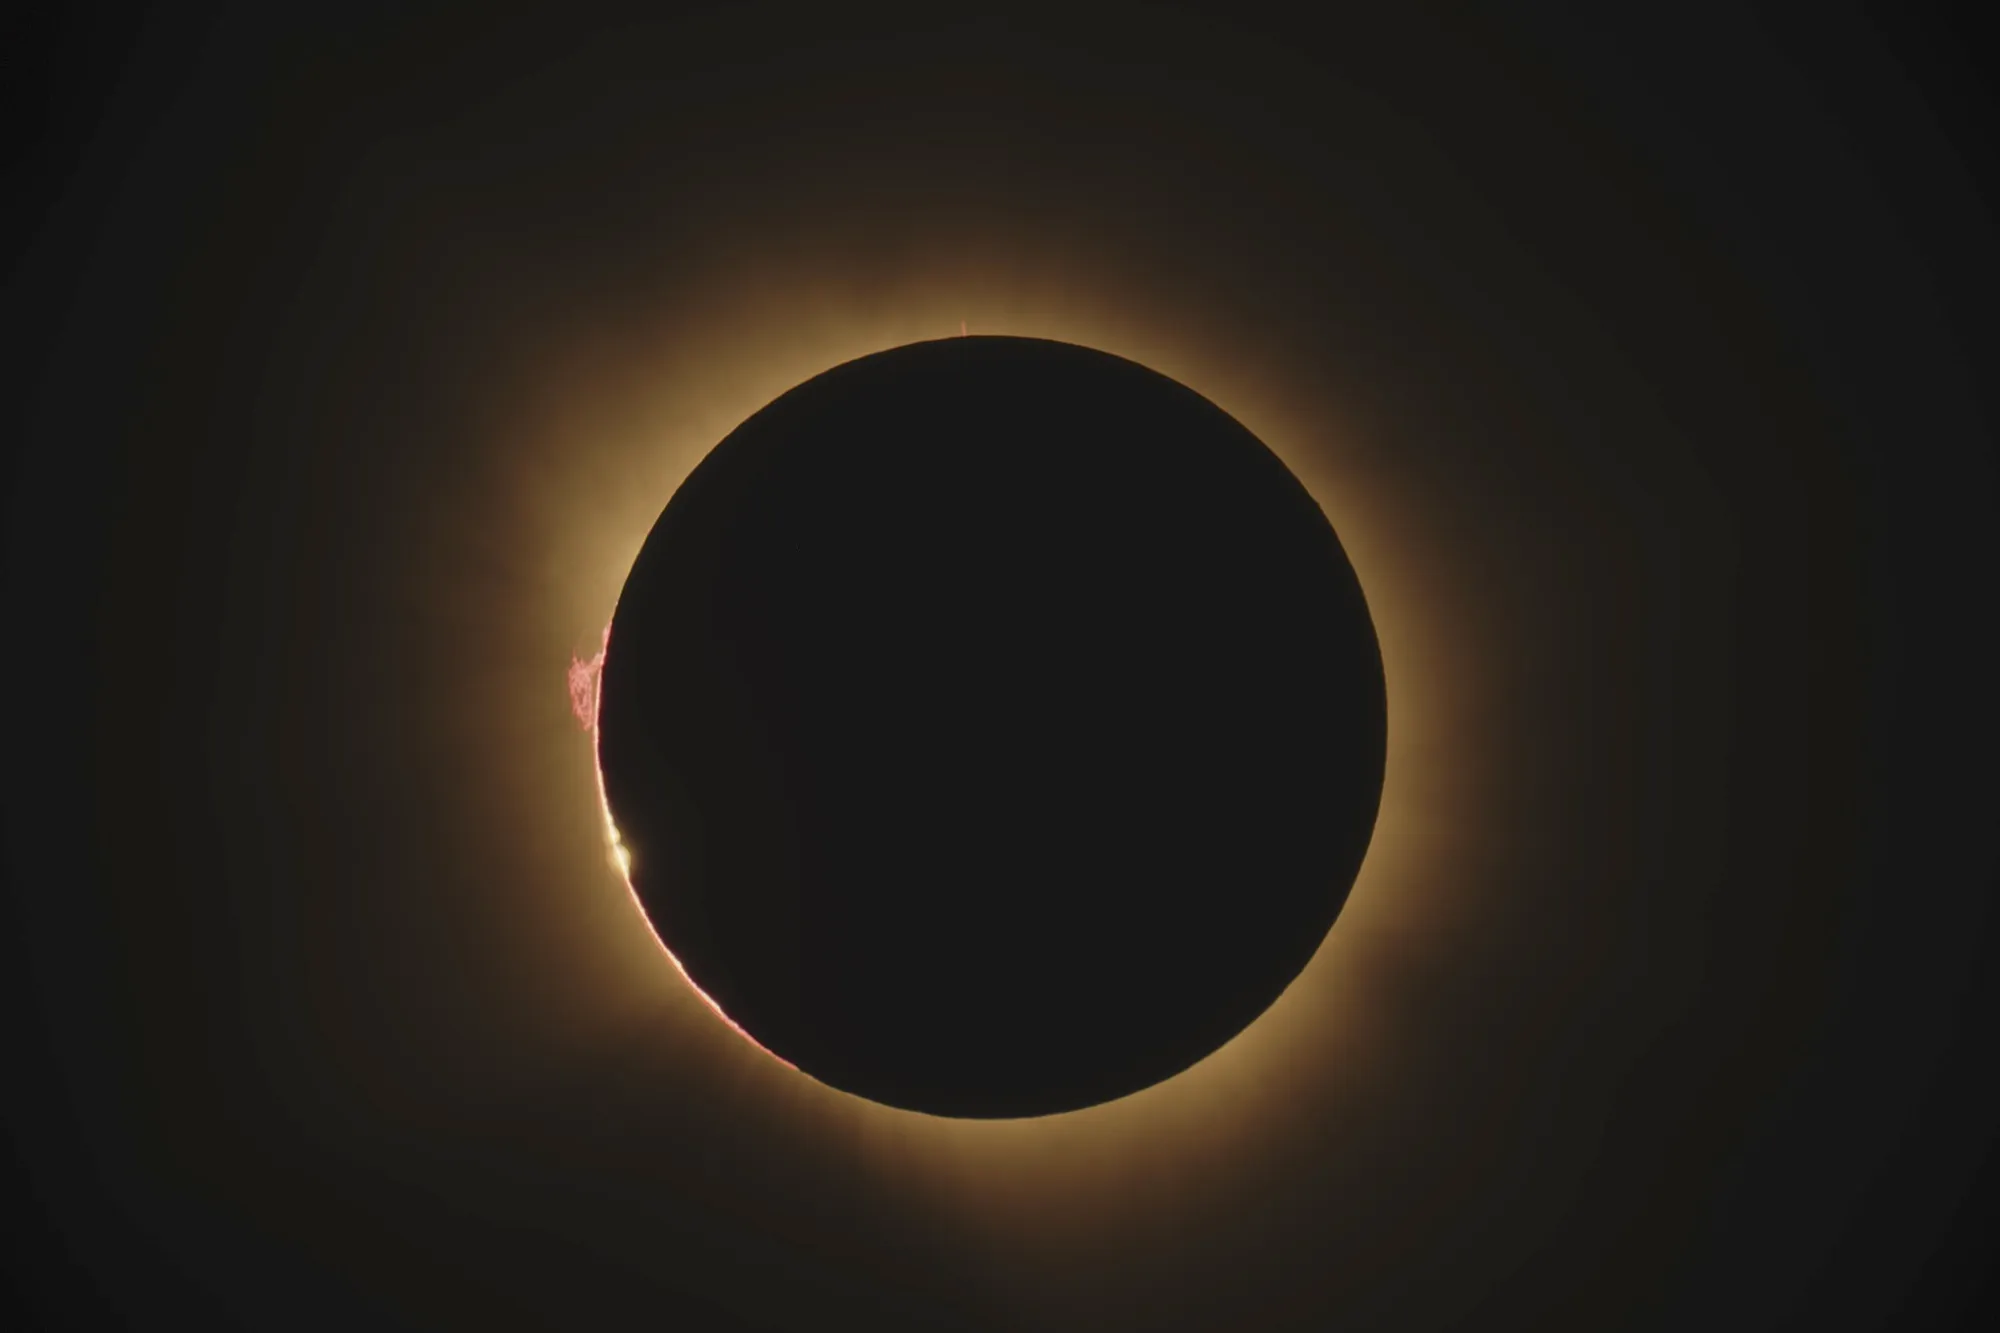
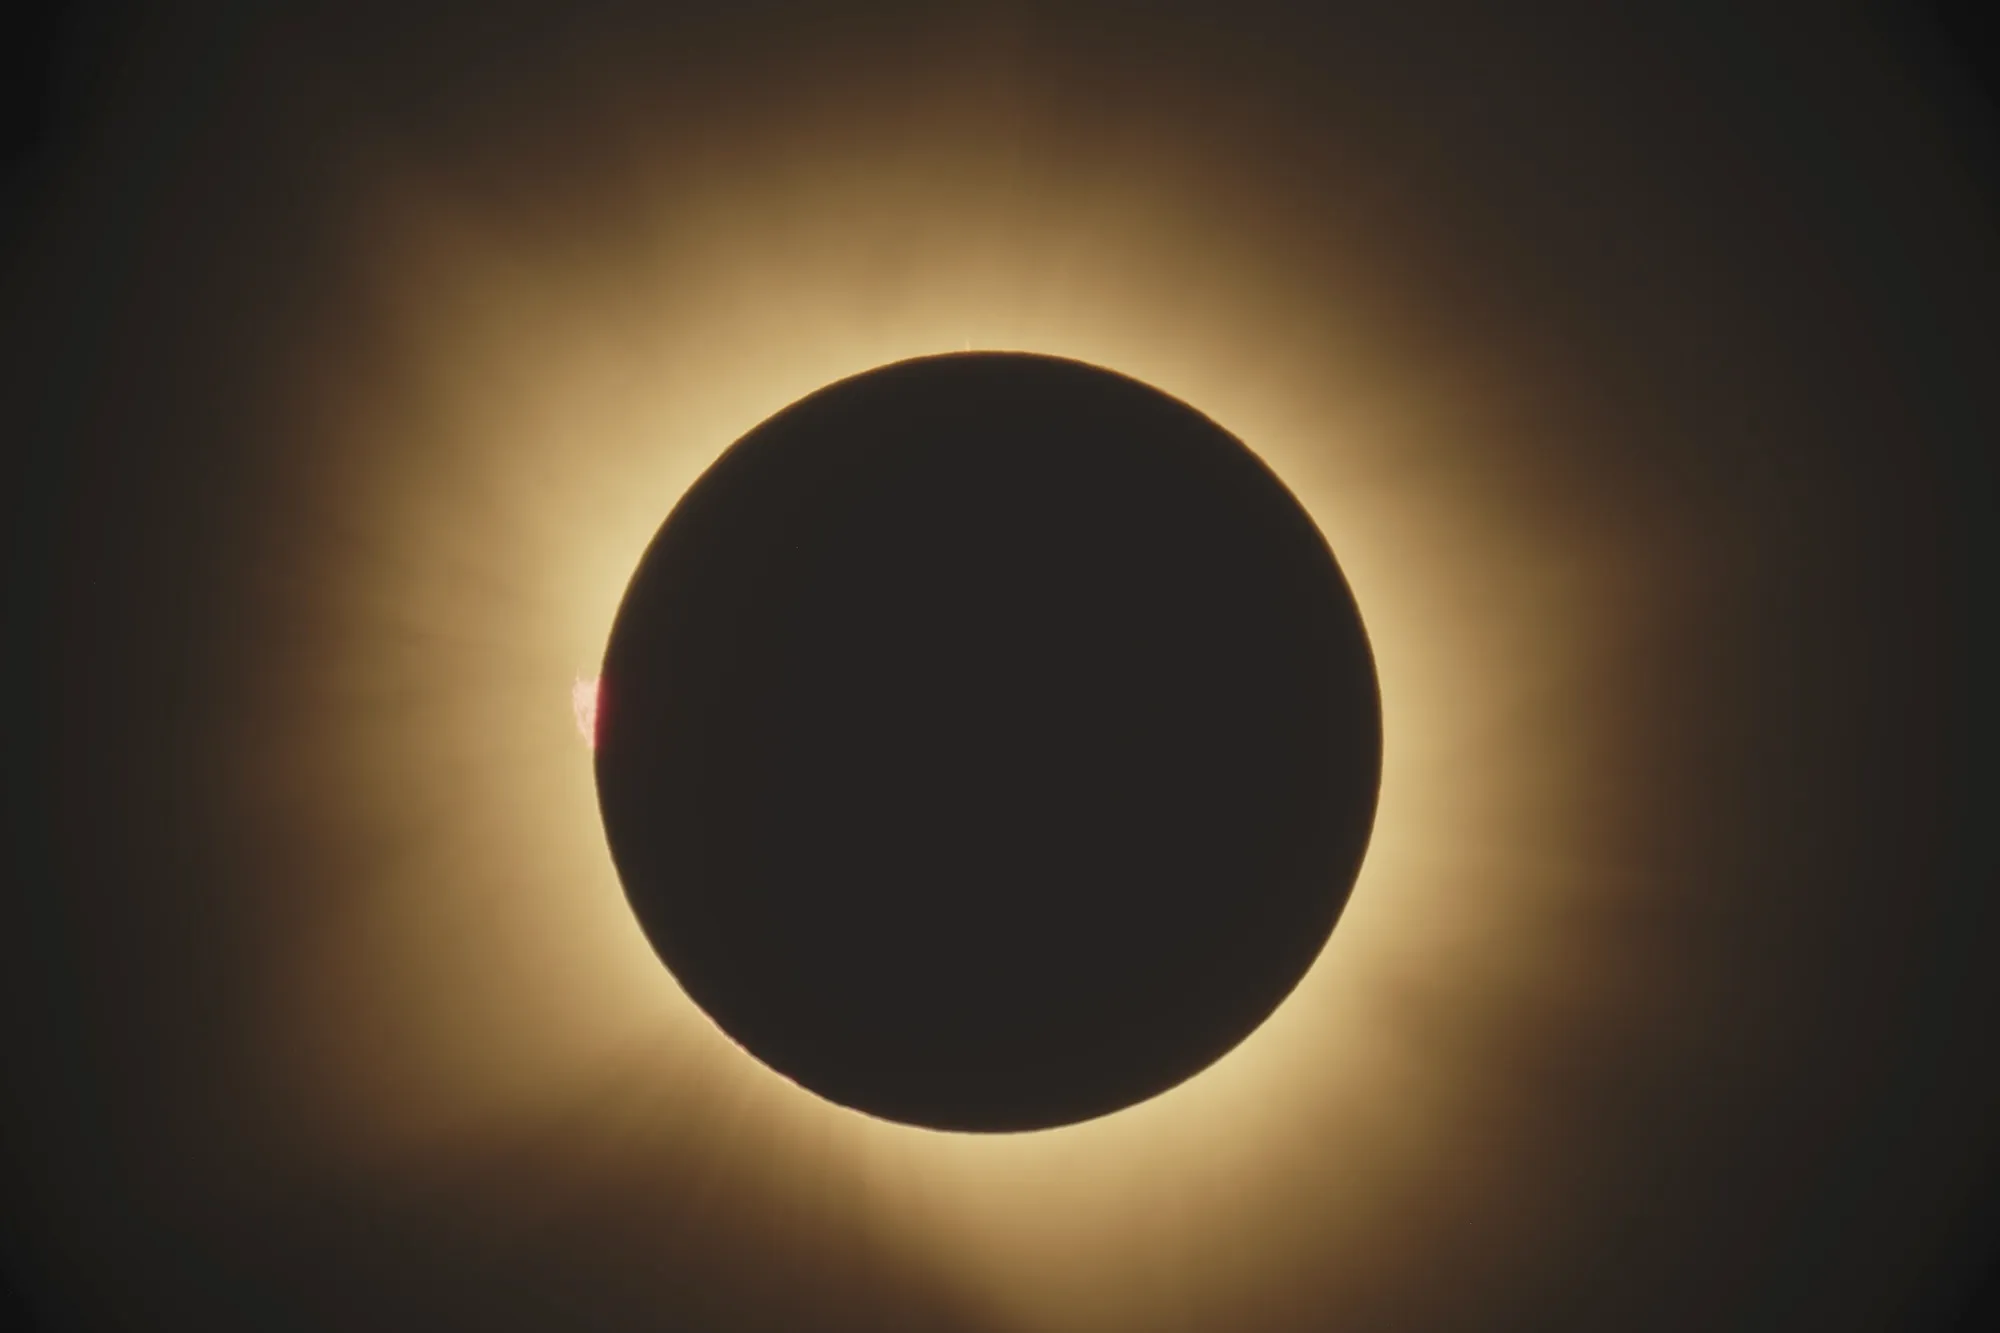
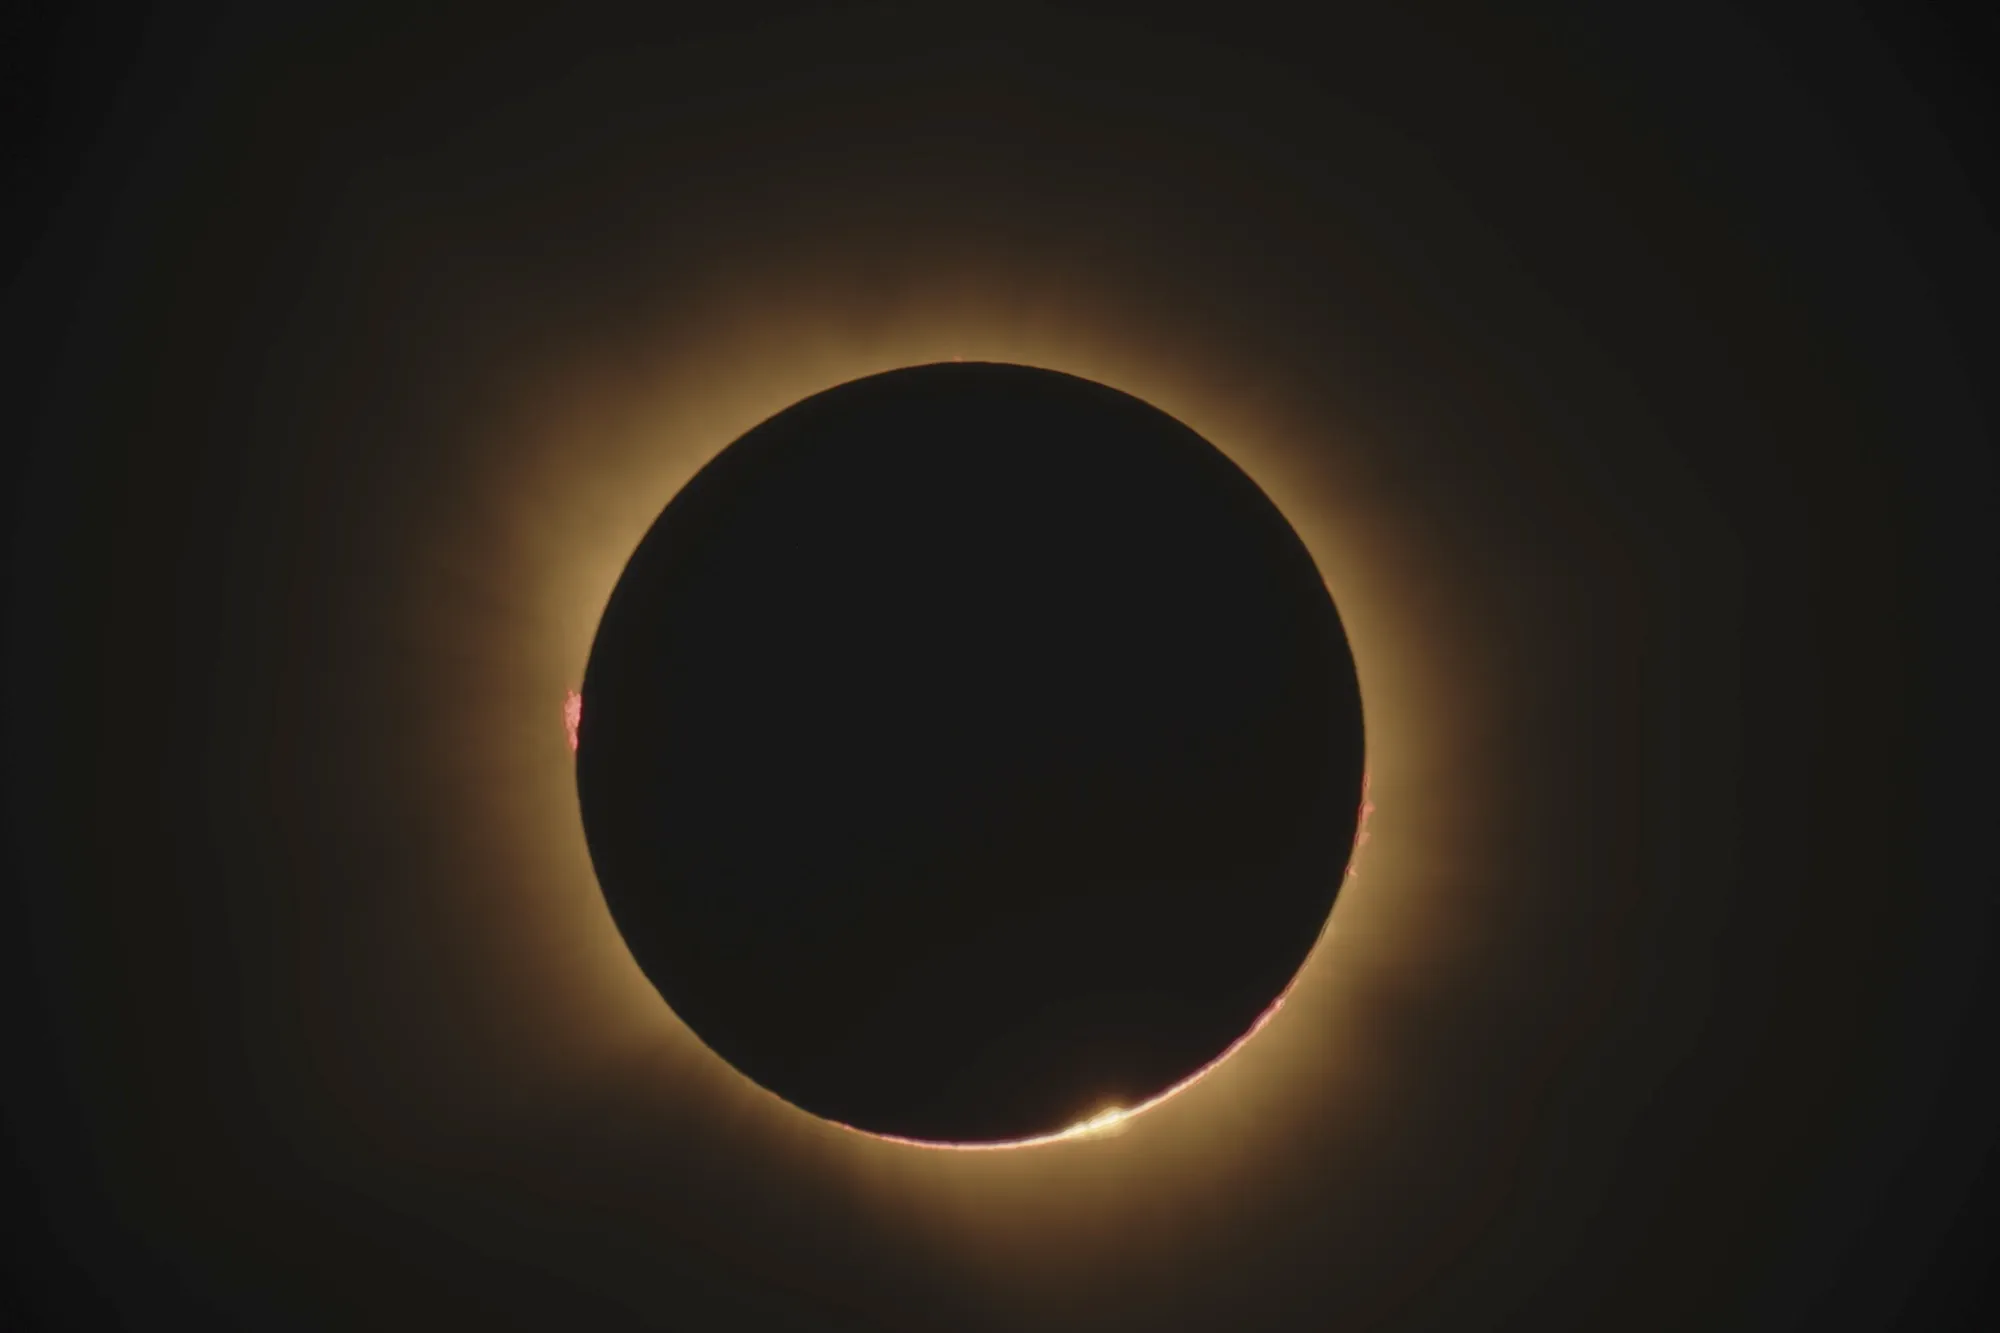
The three synchronised shots, each a merge of 5 bracketed frames: entry, totality and exit.
What worked
The filter swap, which allowed no second attempt. The audio cues sounded and the magnetic mount gave no trouble. It is the only thing that needs doing to the telescope once it is running — apart from the periodic recentring to correct the mount’s drift.
The timing of the instants, the part we had the most doubts about. The anchored shots landed where they were meant to and the beads come out in very good detail. All the work of placing them by risk rather than centring them, and of getting past the circular-buffer lock-up so a burst could fire at an exact moment, shows up directly in those frames.
The cover photograph, though, did not come from any of the three one-shots. It came from an ordinary bracket in the transition configuration, specifically the 1/15s step at ISO 100. A single frame, with nothing calculated behind it, and it turned out very well.
The power bank and the intervalometer, which ran the whole afternoon without a single failure.
The exposures, except for the partial phase on the way out, where atmospheric extinction forced corrections on the fly. The global compensation earned its place there, though: it went up to the maximum during that phase, at which point we had to change the configuration by hand.
What we’d improve
Tracking was the main problem. The mount’s Solar Track Mode drifted and had the Sun needing recentring every few minutes, most likely because levelling was not perfect. That costs us post-processing time on the timelapse, since the Sun does not stay put in the frame. And focusing, for the same reason, calls for a motorised focuser that avoids touching the tube at all.
The earthshine could be better. The one-shot fired at its instant and the 2s exposure does record something — the lunar maria can be made out in the frame. But bringing it out takes processing aggressive enough that the image ends up full of noise. I’m not happy with the result. It may have needed a good deal more exposure, or it may be that with the Sun at nine degrees and all that air in the way there was nothing more to get.
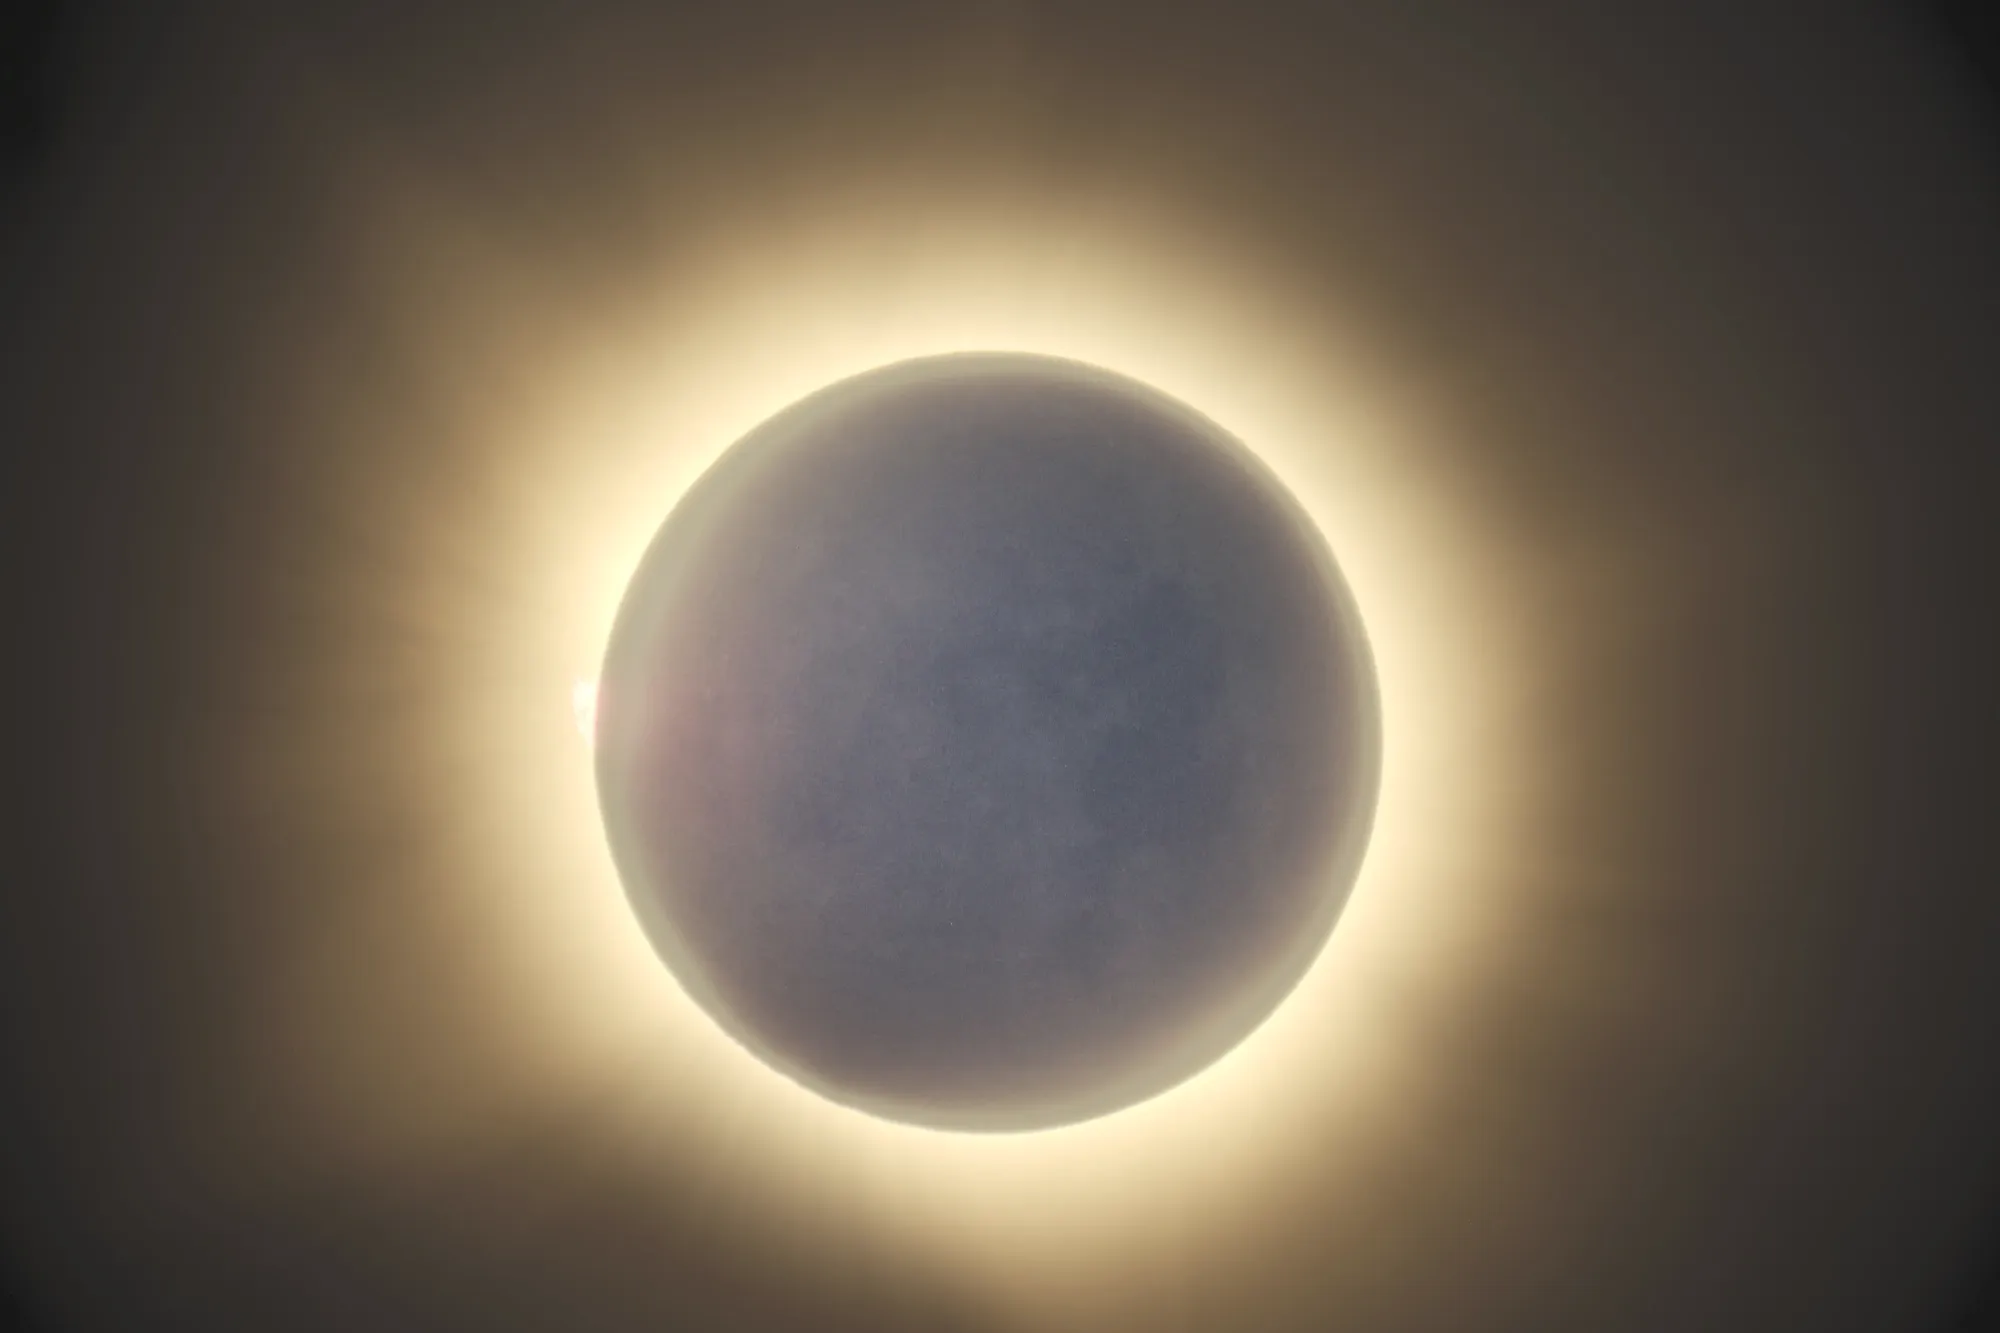
What can be rescued from the 2s frame. The maria are there, but noise and the corona’s halo swallow the image.
The partial phase on the way out went off plan. The EXIF from that afternoon tells the story. 1/1000 at ISO 640 lasted eight minutes: by 20:40, with the Sun at around seven and a half degrees, it already needed two stops more. By 20:54, with the Sun at about five degrees, compensation was at its ceiling of three. Seven minutes later there was nothing for it but to change the configuration and lengthen the exposure by hand — 1/13, then 1/4, then a second, and up to eight — and at 21:19, with the Sun at half a degree, we took the filter off for the last frames. The final one landed at 21:28, with the Sun already down.
The reason is that extinction does not grow smoothly. The tables give close to two stops for a Sun at nine degrees from our altitude, 2.4 at six, 3.5 at four and around seven at two. No fixed value could have followed that curve, and the ±3 stop margin only covered the drop from nine to roughly four degrees. In exchange, it gave us frames like this one when we pulled the filter in the final moments.
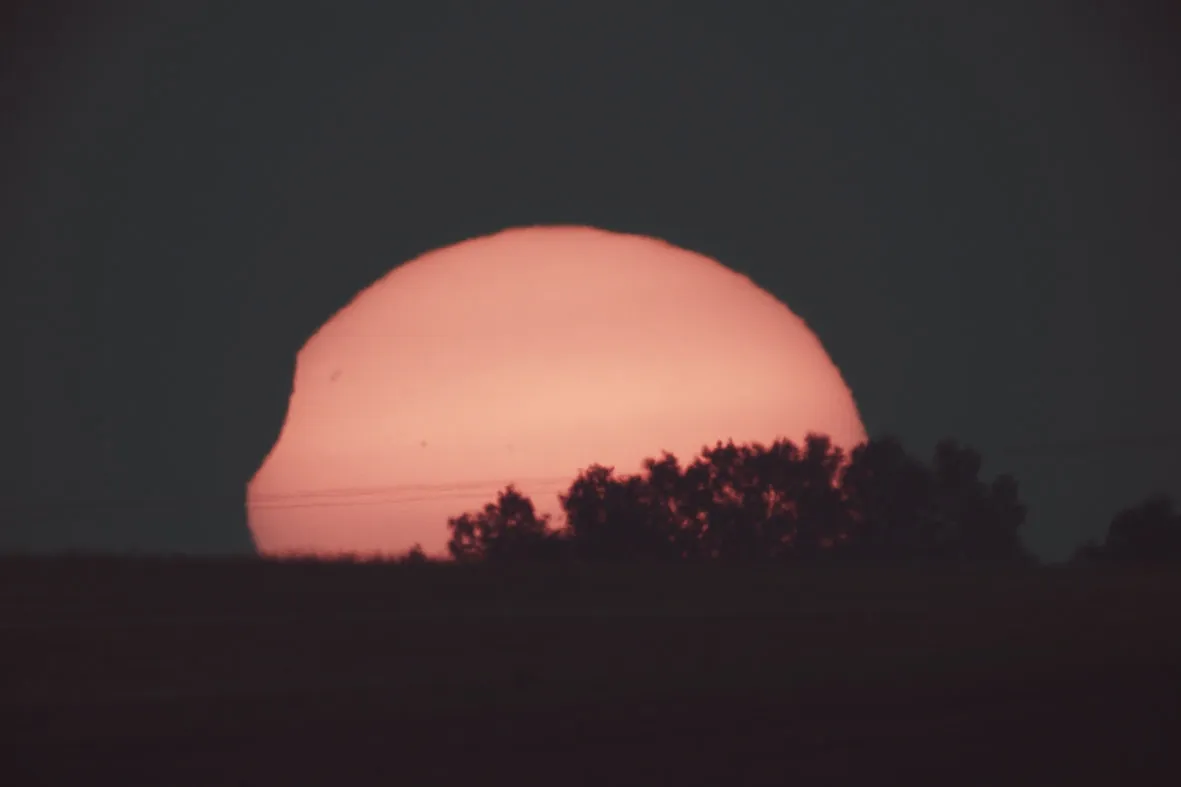
No filter, with the Sun already touching the trees. The Moon’s bite is still there on the edge.
The experience
Spectacular as the photographs we came home with are, they are nothing next to having been there. The light falls in a way that matches no sunset, and before you notice, a ring of fire appears in the sky, and the sight of it stops you dead.
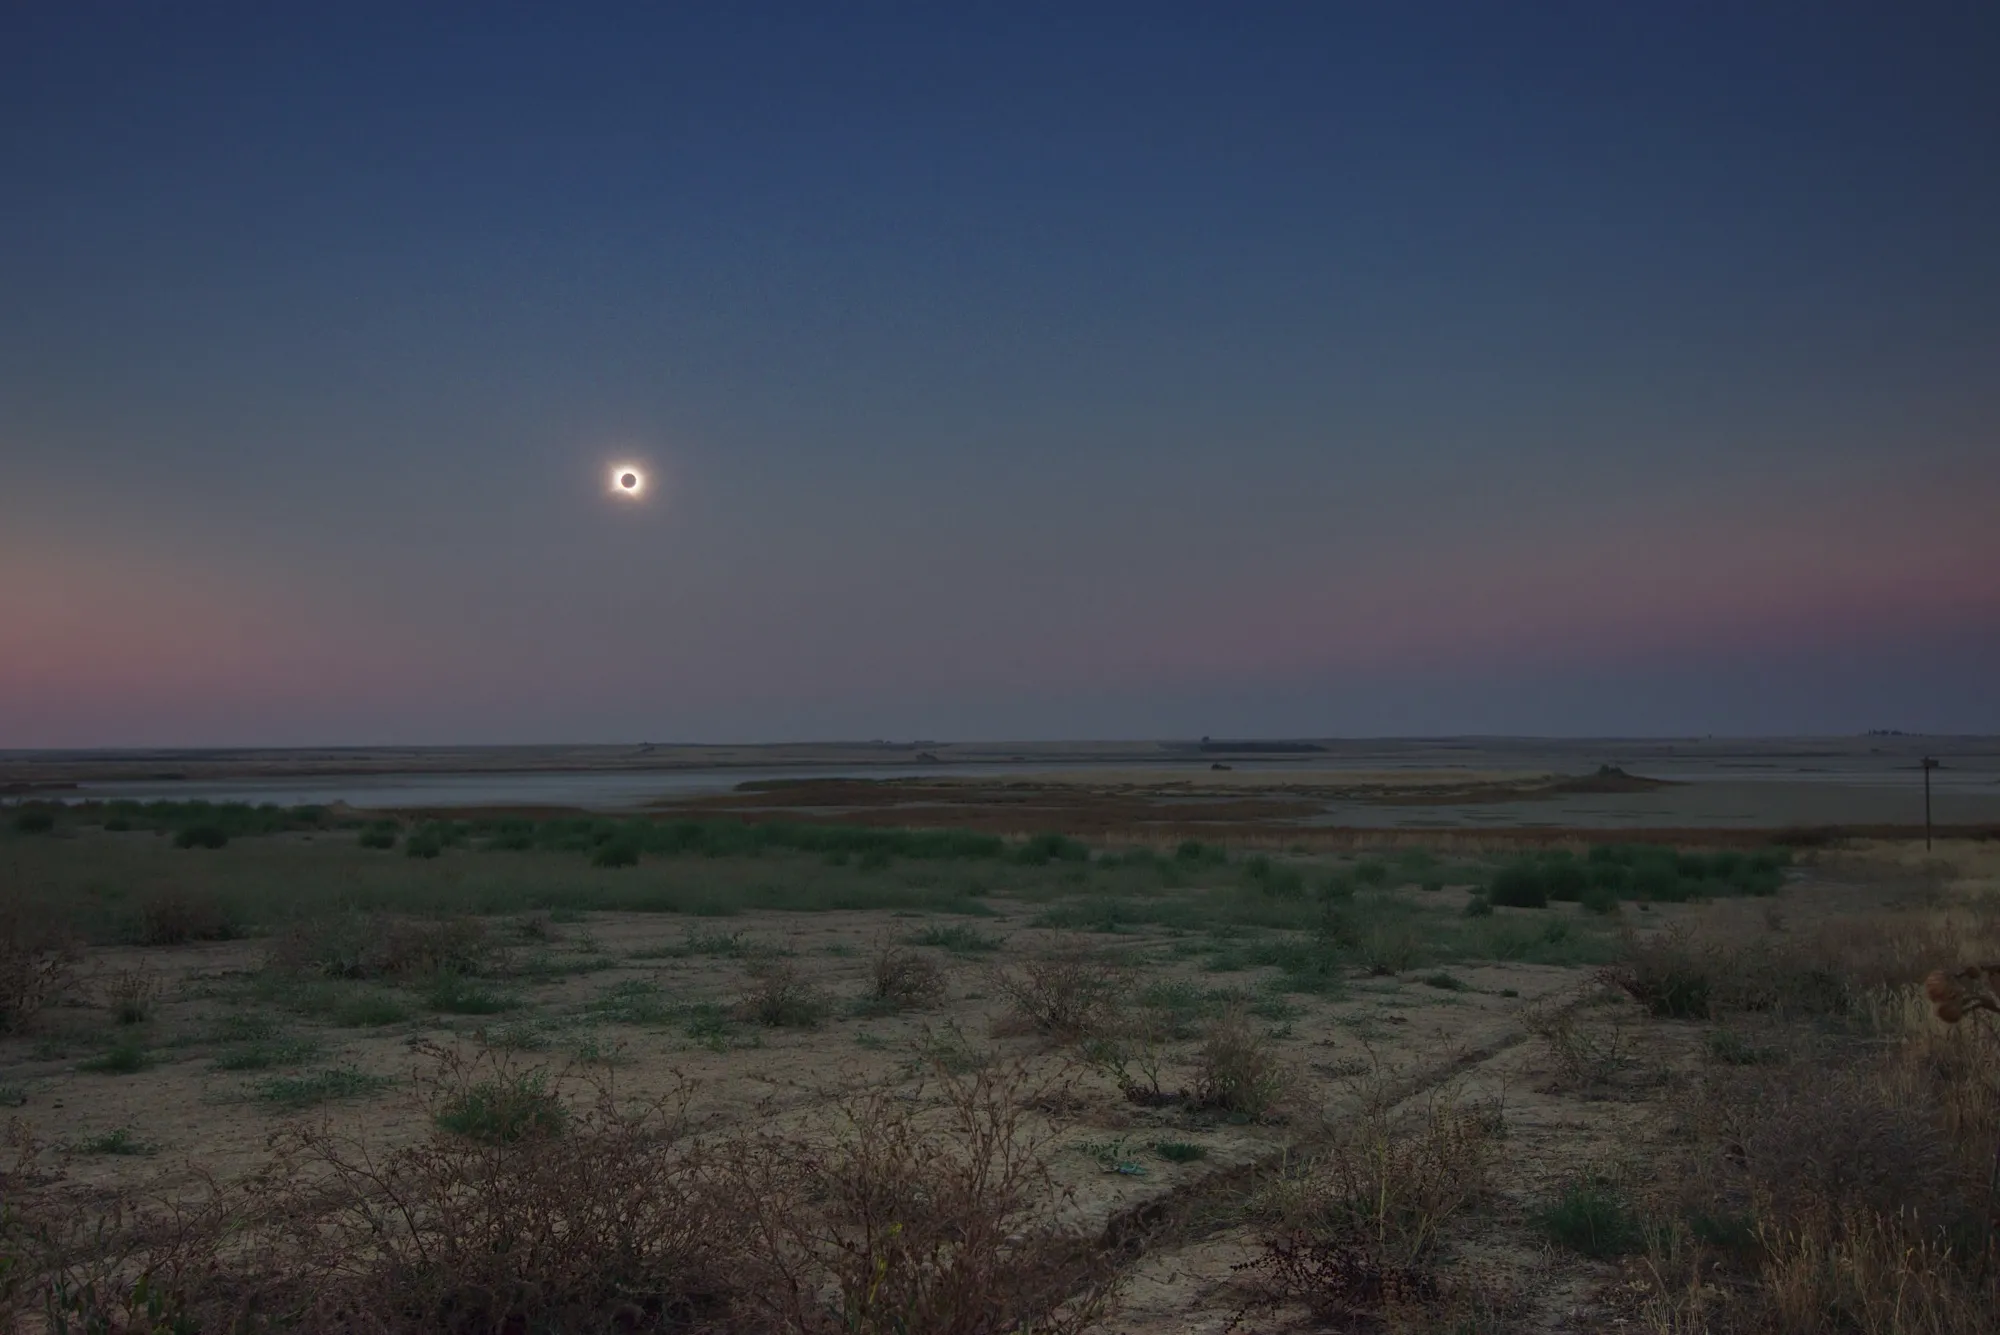
The lagoon during the eclipse, shot on the Nikon D5600 at 20mm — ISO 400, f/4 and a bracket of 1/2, 1/10 and 1/40s.
On 2 August 2027 there is another chance to live a total eclipse in Spain, this time in the south. In Málaga, where I live, totality will run for almost 2 minutes. There will be nothing better to do that day.
The video below captures the two most intense moments, the entry into totality and the exit from it, along with the full filter swap and the frames taken by hand on the other camera.
This is how we lived that once-in-a-lifetime moment.
References
- An intervalometer with the Raspberry Pi — the trigger and its camera abstraction layer
- A magnetic solar filter for the Mak 127 — the quick release that has to be worked twice
fp-lapsesource on GitHub- MrEclipse — Fred Espenak’s Q-factor exposure table
- Atmospheric extinction, by Joe Cali — how much light the atmosphere takes with a low Sun, in stops and by altitude
- Stellarium — the planetarium we rehearsed the timing against
- Xavier Jubier’s interactive eclipse map — ephemerides with lunar limb correction, for the point we watched it from